Showing posts with label li-ion. Show all posts

Wednesday, January 20, 2016

NITECORE MH27,1x18650, XP-L Hi LED,additional Red/Green/Blue LEDs

The MH27 is a new 18650 powered flashlight from Nitecore.
It has a great looking tactical design and various nice to have features-like additional color LEDs and an option very appreciated by many users
in the last years-a micro USB charging port with built-in charging electronics.
The model is also equipped with the specific for the latest Nitecore flashlights,back-lit button.
For a great results in terms of beam performance,the MH27 is equipped with a latest Cree LED,the XP-L HI V3,high intensity LED.
Regarding machine work done on the flashlight,build quality and anodized finish,my sample of the MH27 is on a very high level.It is hard to criticize it.

I found the form factor quite convenient for my hands.The conventional rear switch and the side dual-switch can be accessed with no problems.

Matte black finish.Excellent knurling without scratches or dents,on my sample.
Good design,which provides comfortable grip.
The grip ring is now better than ever.Made of metal,threaded for optimal stability,with no rattling,wobbling.
Big double side switch for mode selecting.

This is one of the most well designed flashlights,I have tested. Lots of good options are integrated into this flashlight,
which has the size of a regular tactical flashlight working on a single 18650 battery.

To charge the battery without taking it out of the flashlight,you just need to connect the supplied MicroUSB cable to your computer,power bank,or а wall charger.
I measured the maximum current draw during charge 540mA. This means,the MH27 can be charged from any USB power supply,even from not so powerful sources that support only 500mA charging.

The semi-transparent side button is blinking to indicate the charging status.
The charging port is covered by tick silicone cover/pad,which should keep the water and dust away from the MicroUSB port.
According to the specifications,the MH27 is IPX8,up to 2 meters waterproof and submersible.
I don't have a way to test it,so have in mind the port if you plan to use the flashlight for deep diving.

The stainless steel bezel is also matte and does not cause visible parasitic reflections.
The exterior machining and anodizing quality are on a very high level on my sample.
Total 6 cooling fins help the heat transfer,and keep the LED temperature in an acceptable range.

As almost any other side switch the MH27's switch takes some time to find it by touch.
Once you find it,it 's easy to operate and does not take much effort to press the needed side-left or right.
Here the button has a shape that helps a little to find it by touch and of course the side switch is a secondary switch-for mode selecting.
It is quite large in size,so pressing it with big fingers should not be a problem.

The side switch cover is made of soft silicone(or rubber),as it is partially transparent,allowing the blue light from the indicator underneath to be displayed.
Easy access to both switches from any position.
Forward clicky switch with momentary On possible at the tail.
All edges around the switch are well rounded-no sharp uncomfortable edges.
The tailcap design allows also tail-standing,but not stable enough for frequent use.

Nitecore EC4S, Nitecore MH27, Nitecore SRT6, Olight M23 Javelot

Pictures from the user manual: Specifications,features and User interface.

Here is the user interface well explained in the user guide.
The user interface is very well implemented and completes the overall idea of the MH27.
You can also check the battery voltage-indicated by the blue light under the side button.
Press and hold both buttons of the dual side switch and Turn the light ON. The blue light is flashing,indicating the voltage-4 times plus 2 times indicate 4,2V.
After showing the voltage,the blue light goes in to location flashing state,as the main white light stays OFF(during the voltage indication,too).
If you want to start the light,you have to restart the light by the rear switch.
The MH27 has a lot of options in the user interface,still for the regular user,operating the flashlight is easy and does not take much effort,even to a new user.
(I say this mostly because of the last tendency for different ways of turning the light ON and OFF-press and hold is hard to remember for new users).
The MH27 is quite intuitive if you use it without too much clicking-just leave it on the desired mode and turn it ON/OFF by the tail switch.
The more advanced users will also be satisfied with couple of useful features.


Below is the MH27 disassembled on three main parts.
You can see the typical for most Nitecore flashlights,physical reverse polarity protection.It requires the use of button top batteries.
All individual parts fit well without gaps.The overall construction of the flashlight seems very stable.
Rectangular cut threads at the head part of the battery tube,triangular cut at the tail end.Both threads anodized,for better wear resistance.
All parts feel solid,with sufficient thickness of the tube walls.

Standard Nitecore packaging.
Micro USB cable is included.


The MH27 comes with a holster,lanyard,pocket clip,spare switch cap,spare charging port cover,two spare O-rings.


Here is a GIF showing the holster.

Below is a picture of the MH27 with the pocket clip attached.The clip that came with my sample needs some bending to give it a better form and more tight sitting.
The grip ring is close to the attaching point of the clip,but does not lock it,as seen in other flashlights.

A comparison showing the different way of attaching the clip of the Olight M23.
The M23's clip is locked under the grip ring and also wider and more stable.

The most important part of a flashlight-the light emitting zone. Deep reflector with a Cree XP-L Hi V3 main white LED with integrated holes for three 5mm,rounded color LEDs-RED,GREEN and BLUE.
The 5mm LEDs are not the best choice for a good beam,but their form and size save a lot of space and this allows mounting them into the same reflector with the main white Cree LED.

There is what more to be desired from these beams,but I am sure many will find the extra option for using RED,Green,or Blue light quite useful.
Beam distance of the three LEDs is good.I don't think it could be used for distance illumination,most likely for close to mid distance operating.Reading maps,trace finding,etc.
Color light may be used also on camping,or even indoor as a night light.

The main reflector has a smooth reflecting surface(not orange peel),but still has some texture for better mixing the beam,which is recommended for LEDs with very small emitting area.


Below is a very close picture of the RED LED.

Close up picture of the Blue LED.(below)

Close up picture of the Green LED.(below)

Cree XP-L Hi LED (below)
The best choice for good throw from a compact reflector,without sacrificing quality of the beam.
My impressions of all flashlights with a Cree XP-L HI, I've tested so far,are only good. Quality beam profile with no tint change.

Run-time performance.
Below is a run-time test on Turbo mode done twice,once using a cooling fan for keeping the flashlight temperature low and relatively constant,once without cooling,just static flashlight.
Testing the flashlight with a cooling fan demonstrates its optimal performance and how it will work outdoor in the cold weather.
Indoor ambient temperature was ~20C during the tests.

I am pleased to see that the Nitecore's Advanced Temperature Regulation is functioning really well in the MH27.
The electronic driver is maintaining optimal working temperature,without leaving it to reach uncomfortable or dangerous levels.
Great work from the Nitecore engineers on this driver!

As expected,without a boosting circuit and using single Li-Ion power source the MH27 is not able to keep the advertised 1000 lumens for long.
Once the voltage drops,the output starts to decrease.Yet,the MH27 does quite well in the first 15 minutes.Just 100 lumens drop,which is hardly noticeable by eyes,especially if it's gradual.
After about 15 minutes comes the difference in output regulation.The driver is registering high temperature and start to decrease the output,until the temperature comes again to the triggering point.
Then it is raising the output back to its maximum possible level,as this time it is lower due to the lower battery voltage.
On the left side in the graph is the output in lumens measured by me in an amateur integrated sphere.
I can't guarantee full accuracy of the values taken by me.

My lumen measurements-
Battery-Keeppower 3400mAh
High mode= ~970 initial output,920Lm 30sec after activation
Mid mode= 297Lm
Low mode= 100 Lm
UltraLow= ~1Lm

I measured also the color beams-but I have no information about the wave length sensitivity of the photodiode I use.
Red=33Lm, Green=19Lm, Blue=19Lm


Beamshots

The MH27 produces a Cool white beam.Clean White on my sample.No bluish or greenish tint.
No visible distracting artifacts. Very well focused beam.Smooth transition from hotspot to spill.
The beam is not just a dot,good only for outdoor use. There is a quite good spill,too.
Significantly better throw distance than the beam from a flashlight with a Cree XM-L2 LED.
53,500cd maximum peak beam intensity,according to Nitecore's data.

The three additional LEDs do not affect the beam quality. I have nothing to criticize here.
A point in the MH27 that many would criticize,is the shape of the Red-Green-Blue color beams.
The 5mm LEDs sit in holes that have part of the reflector on one of its sides.This part of the reflector reflects part of the light and distort the beam shape.
Depending on the way you would use these beams,their shape might be very distracting/annoying,but in my opinion for regular use without hunting on a white wall,
the option to have color beams,together with the long throw white beam is still a big advantage.

Blue-Green-Red-Low-Mid-High-Turbo

Beam very close to the wall.


1 meter,1/20sec

1 meter,1/250sec

1 meter,1/500sec

1 meter,1/1600sec

5 meters, 1/6sec

5 meters, 1/50sec

5 meters, 1/250sec

5 meters,1 sec exposure time

After testing the Nitecore MH27,my impressions are only good.There were no flaws and using the flashlight was pleasure.
The MH27 covered all my expectations and even more-the beam profile is much better than I expected.
This is one of the better flashlights I have tested recently and is not hard to recommend it to anyone searching for a good 18650 flashlight.

Strong points:
Good build quality; Great design; Comfortable,stable grip; Metal grip ring with threads; Physical tail switch is usually a plus-real disconnecting the power,no parasitic stand by drain,easy for new to modern flashlights users; Convenient double side button with well thought out interface; Good modes; Great user interface; Actually working Temperature Regulation; Good heat transfer design,plus latest XP-L Hi V3 LED keep high lumen output,maintaining the temperature in acceptable range,at the same time; Great beam in terms of color temperature and shape;High peak beam intensity,thanks to the XP-L Hi LED; Great distance of throw for this size reflector;
Even the three holes for color LEDs,the main white beam is not affected; Charging port;

Weak points:
No low voltage warning,no low voltage protection; Basic pocket clip; Color beams not symmetrical in shape; Not so stable tail-standing;


Thanks for Reading!

Big thanks to Nitecore for providing the MH27 for test and review and for producing a really well thought out flashlight!

Monday, October 26, 2015

NIWALKER Nova MM18 (1xXM-L2 + 2xMK-R)(4sx18650) Review

Important notice:
The MM18 has a very high Standby current draw! Always remove at least one of the batteries,when you will not use it for a few days,or a week.
The green indicator under the buttons will stop flashing when the voltage of the batteries is low. It is important to take the batteries out of the flashlight and to recharge them.
Leaving the batteries in the flashlight for longer time is highly possible to kill them and has following issues(could be dangerous)when you recharge and discharge them later.

If you are not used to check the flashlights and batteries every day and to know approximately how much charge is left in the batteries,it is highly recommended to use only batteries with a built in protection circuit.

Quite busy,I left two Niwalker flashlights unattended for a few days and until I notice,I lost 8 batteries!
There is no Low voltage protection to stop full discharge.The MM18 discharged the batteries down to 300mV each!! This is 1,2 V total.
The flashlight has low voltage protection while turned On and also prevent activating the light when the battery voltage is low.However,it will continue to discharge the batteries until they are absolutely empty,while in standby state!
The MM18 is a great flashlight in use,but please keep my recommendation in mind. Lets keep our hobby safe.

Review

Niwalker is one of the manufacturers with different ideas how a flashlight should look like.
Each one of their flashlights has its own character and specific appearance.
The MM15 model is one of the most popular fully flood beam flashlights with a great wide angle,warm white beam,thanks to two MT-G2 LEDs.
This year Niwalker is updating the MM15 model and even more importantly is releasing a new "multi-task" model called MM18.
In the review below I am reviewing the Niwalker MM18. I will try to cover all important characteristics with important info about the run time performance.
Enjoy!

Specific for the new model is the multi-cone reflector with three separate LEDs.
One Cree XM-L2 and two Cree MK-R emitters.35mm diameter smooth reflector for a well throwing focused beam.
Two 25mm textured reflectors with the MK-Rs for a wide floody beam.
A promising combination for a multi-use flashlight.

The lighting modes are controlling by two momentary/electronically operating side switches.
One switch for the throw beam and one for the two flood beams.
Every of the switches work independently of the other,with no interacting their operation at all.

The UI is the same for both buttons. 6 brightness modes for each beam plus Strobe,SOS and Beacon.
The highest 6th mode and the flashing modes are hidden and can be accessed only by quickly pressing the switch two or three times.
So,as in all premium flashlights,you don't have to go through the all modes every time when you want to switch the mode.
This makes the UI a little easier to use.

Here is a picture from the user manual describing all modes-their lumen output and peak beam intensity.
Note that the index for waterproofing is IPX7.

The MM18 net weight is ~500 grams. Add four batteries ~190gr to get the full weight ~690 grams.
Definitely a solid flashlight. According to the specifications,there is a large copper heat sink pad under the LEDs for optimal thermal conductivity.
The aluminum body seems also quite thick for good dealing with the heat.


The MM18 comes in a sturdy sport bag/holster. No cardboard box.
The holster has impressive amount of pockets. In some of them are placed the spare parts and some tools.
Standard accessory is an aluminum handle,if you prefer carrying the flashlight this way without holding the body,which gets quite hot while working on the highest mode.
There are two screws for the handle and tool for mounting them.
Spare O-ring and nice lanyard are also included.

Here is the flashlight disassembled on two main parts.
Four high drain 18650 batteries are needed for powering the MM18.
The four 18650 batteries lie in a holder,which unusual is stationary mounted to the head.
The batteries are connected in series,providing high voltage for the multi-core MK-R leds.

The fixed holder is saving us some troubles when inserting the batteries and also saves some of the parts needed for a good electrical connection with the head.
The electrical connection is through the metal sticks.Physical lock out to disconnect the Standby consumption is not possible.
Due to the fixed battery holder,inserting the batteries takes a little more effort.
The space is well designed for unprotected batteries and they fit normally.
The edge of the battery tube has well rounded end edge for smooth battery inserting,but even that the batteries get scratches from the contact.
Inserting protected 18650s is also not a problem,as I managed to insert a protected Keeppower 3400.
If you use protected batteries,more care is needed not to tear the wrapping.


All batteries are in the same direction-with the minus pole to the flashlight's head.
There are four springs at the head end of the holder.

A nice close up showing the impressive anodizing,the level of the switches and their protruding.
You can see also the anodized square cut threads.

The overall machining of each parts is excellent.Very precisely rounded or bevelled edges.
The only thing I found a little contrasting are the two edges,cut for opening space for the handle.
As you can see on the picture,they are fairly sharp and I would like them rounded as the rest of the edges.
I can feel them with my thumb,but its position is usually over the buttons and then the edges are not noticeable,at all.
Impressive anodizing all over the body with the specific for Niwalker fully matte black finish.
I don't have any critique about the design other than the one I pointed above.I found it comfortable and really well looking at the same time.

Handle mounting point (picture above). Tripod screw mounting point(picture below)(does not fit all tripods).
There is no any kind of anti-roll designing. Only the handle could stop the flashlight from rolling away,if left on its side.


The switch covers are relatively small. I found them a little smaller than needed and in my opinion people with big hands will need some time to get used.
I also did not tested how is the operating when wearing gloves.
The switches have enough move to feel their pressing.They produce audible sound,which also helps.
I have some concerns about the silicone covers.They look too thin for heavy usage. I can't do wear resistant tests,but don't recommend pressing the switches with nails often,etc.
The silicone covers are also semi-transparent,allowing back illumination from the status LEDs-red(low battery voltage),or green(when the light is On).
Every of the indicator leds shows the status only on its respective beam,independent of the other beam.
Both switches are flashing every three seconds,which helps locating the flashlight and switches in the dark. Initially both indicators blinks simultaneously,but after turning ON/Off one of the beams,they blink in different time,which results in more(double) flashing.If one is Off,the other is On.This could be very distracting for the peripheral vision,sometimes.
The switch which beam is activated stays constantly green,until the beam is On. This will help to find the switch in the dark,when changing the mode is needed.
The switch functionality could be locked by triple clicking the selected switch.Locking have to be repeated also for the other switch,if you want to lock it,too. In lock out state,the flashing indicator LEDs are inactive.

Very clean high transparency glass lens with anti-reflective coating on the front of the head.
You can hardly say it is there. ~65mm diameter of the lens.

A little unusual,but beautiful looking reflector.

Wide flood beam thanks to the two MK-R emitters mounted under shallow orange peel reflectors.


Run Time Performance

The MM18 provides quite a lot combinations of two different beams-spot and flood.Each beam with 6 different brightness levels.
As usual I tested the flashlight on its highest output,as this time I tested also the lower 5th mode,because of the significant difference with the 6th mode,
which is more like a Turbo mode(it is not in the regular mode sequence).
The total curves in the graph below are five.
Flood 5 and 6 mode. Spot 5 and 6 mode. Flood+Spot 5th mode.
The results are very interesting and somewhat unexpected,especially comparing the Flood and Spot beam.
Lumen measurements(measured by me with not laboratory calibrated,or designed integrating sphere).
All lumen measurements and run time tests taken with Keeppower IMR 3000mAh batteries.
Flood modes: 1= 1Lm ; 2=11Lm; 3=149Lm; 4=648Lm; 5=1645Lm; 6=5070Lm(5190Lm initial)

Spot modes: 1=1Lm; 2=13Lm; 3=185Lm; 4=669Lm; 5=980Lm; 6=1300Lm

Flood+Spot mode 5=2410Lm
Flood+Spot mode 6=5540Lm

Pretty well spaced modes and lots of mode and beam combinations that should suite almost every scenario.

The MM18 features thermal triggering brightness step down,which has the purpose to allow you to use the max output as long as possible,without worrying of flashlight overheating.
Unlike the timed step down,this type of step down controlling will/should not decrease the brightness,if you use it in the cold weather outdoor and the flashlight is not as hot as,if used in the hot summer days.
For example,a timed step down decreases the brightness,even if the flashlight is frozen.

To get the optimal output results from the LEDs,I used a small computer fan to flow fresh air around the flashlight,which is mounted and stays static through the whole test.
The thermal step down was presented on the 6th mode Flood beam.The protection triggered after about 9 minutes on this mode.
Even with the external cooling,the MM18's head was hot after 5 minutes,as after that it becomes really hot and not recommended to keep your fingers ,or objects in contact with this part of the flashlight.
Here the included aluminum handle may come in use.
I am glad to see the heat is not excessive on the battery tube,which is important for the batteries.
On the other modes tested,with the external cooling the heat dissipation was pretty good keeping the temperature in normal ranges.
What surprises me is the run time difference between Flood and Spot beams.
Even the lower output and lower voltage required of the XM-L2 LED,the Spot beam times are much shorter than what Flood beam shows.

Current draw measurements:
Flood: 9mA / 12mA / 60mA / 260mA / 780mA / 4350mA
Spot: 9,2mA / 12,4mA / 93mA / 470mA / 750mA / 1170mA

For best performance,it is highly recommended to use high drain compatible IMR/INR batteries from a good brand.
All batteries are connected in series,which requires to match the voltage on all batteries.
The MM18 features also a low voltage protection,which actually works and works properly.
The protection kicked in in every of the tests,leaving the batteries in save condition with quite enough resting voltage.
Voltage on every single battery after the test was ~3,2V. A well working LV protection is really appreciated and I like the safety it gives,allowing me to use unprotected batteries without over-discharging them.
The indicator LEDs under the switch covers also alert for low battery voltage,but in my tests they did not give accurate information about the battery discharge level,as the RED light was On about half the run time.

As any other flashlight controlled by an electronic switch,the MM18's driver circuit requires a certain amount of current while turned Off (Standby mode).
There are many discussions on the forum about the effect of the high parasitic standby drain.
Testing the MM18,it shows the highest stadby drain from all flashlights I have tested so far.
Standby current 5,8mA (10mA with the green indicator light On).
In switch lock out mode the current is much lower 0,85mA(which is actually still much higher than the average).


Beam Shots

The light from the two beams is different color temperature.
The Spot beam produces cool white light. The flood beam light is warmer,I could say neutral white.
Beam profiles are clean,with hardly noticeable artifacts,mostly if you hunt on a white wall.
There is no visible greenish,or bluish tint in regular use.

/I did all possible to represent the real beam tint on the pictures I show in the review.
However it's hard to judge for the tint only by the pictures.There are too many factors that could affect the color reproduction-screen brightness,white balance setting,contrast,etc.
The tint is also depending on the exposure time of the picture./

Indoor Beam Shots
1/6 sec


1/6 sec

1/50sec

1/50sec

1/200sec


Outdoor Beamshots

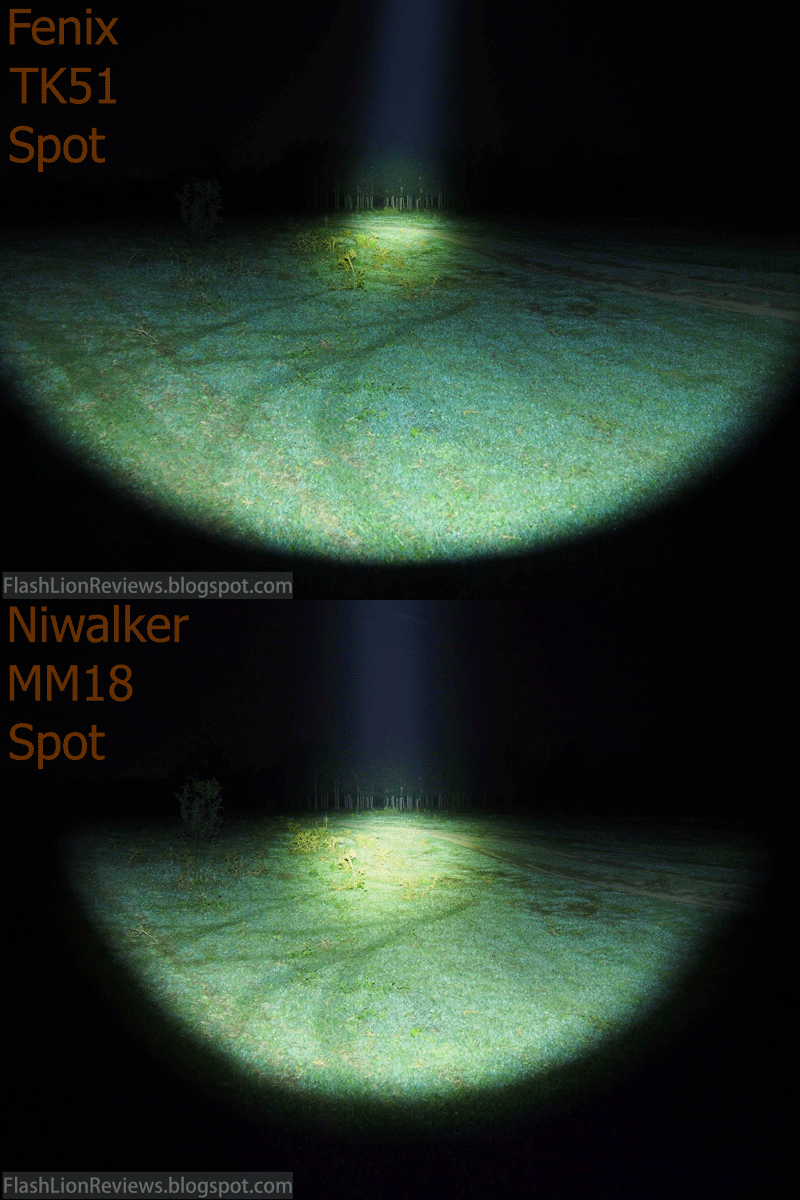
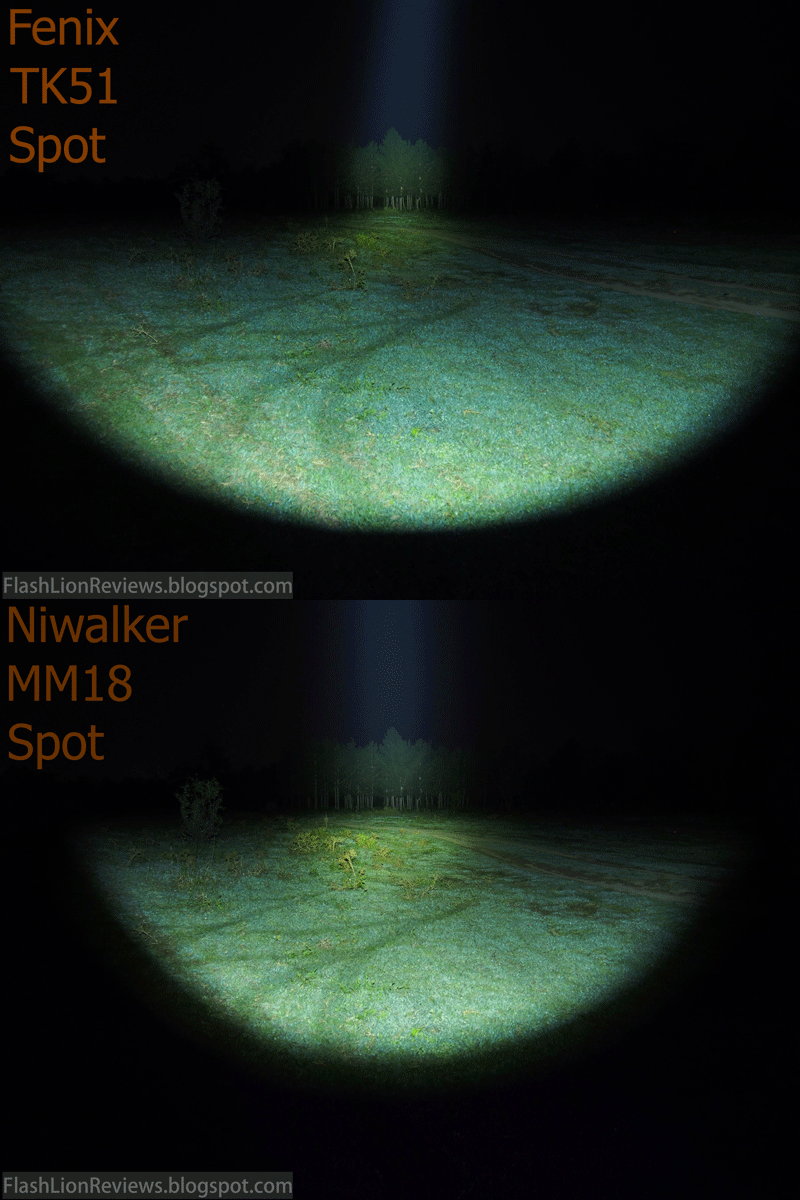
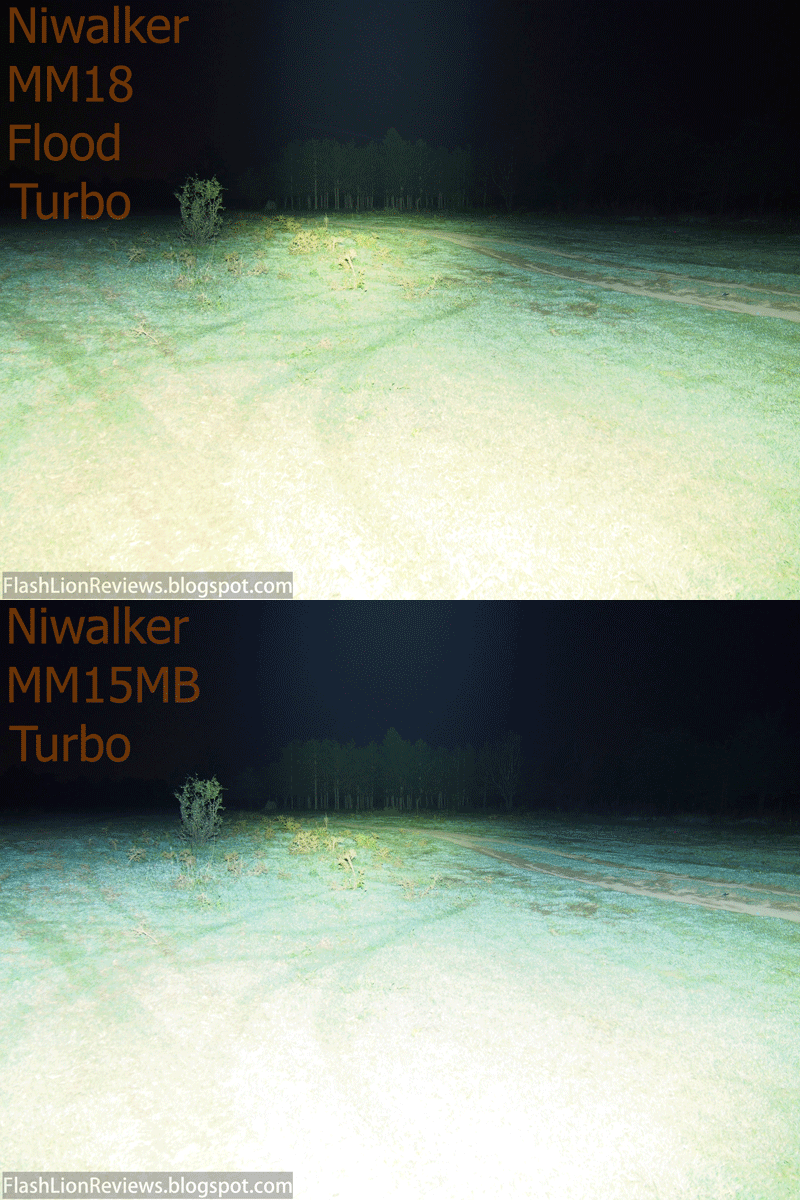
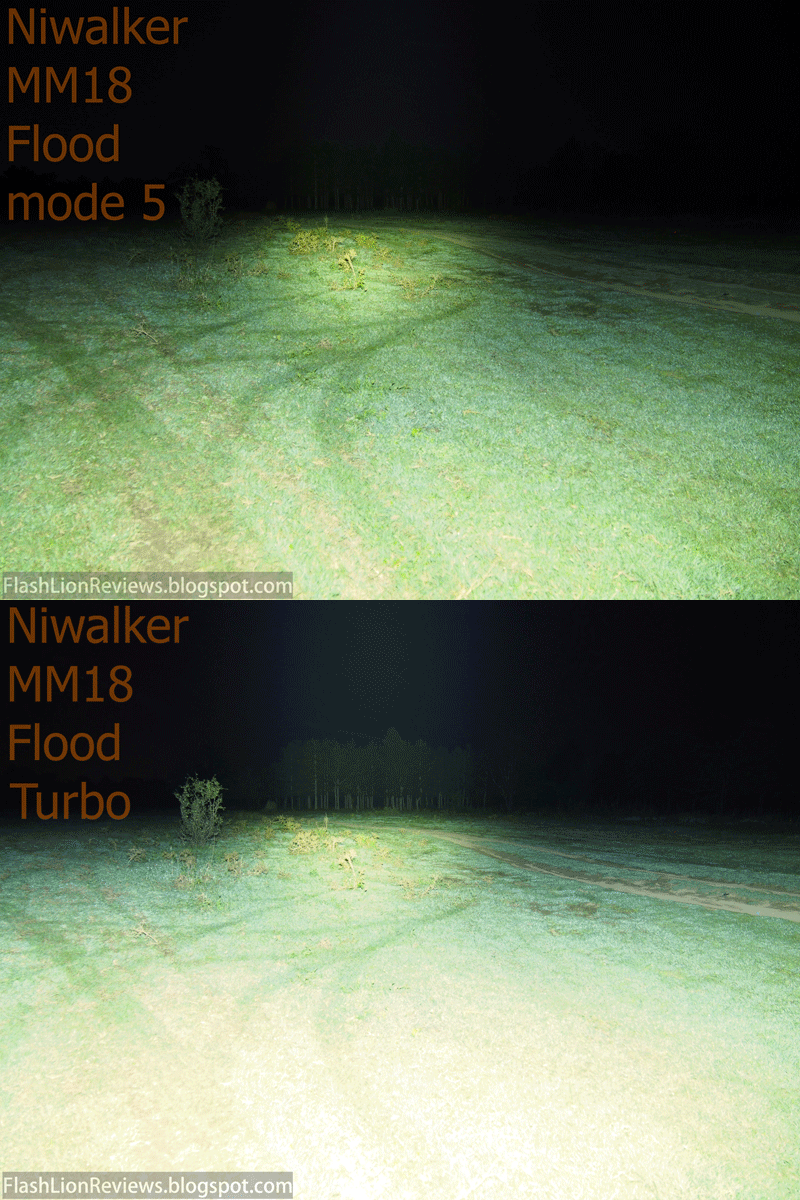
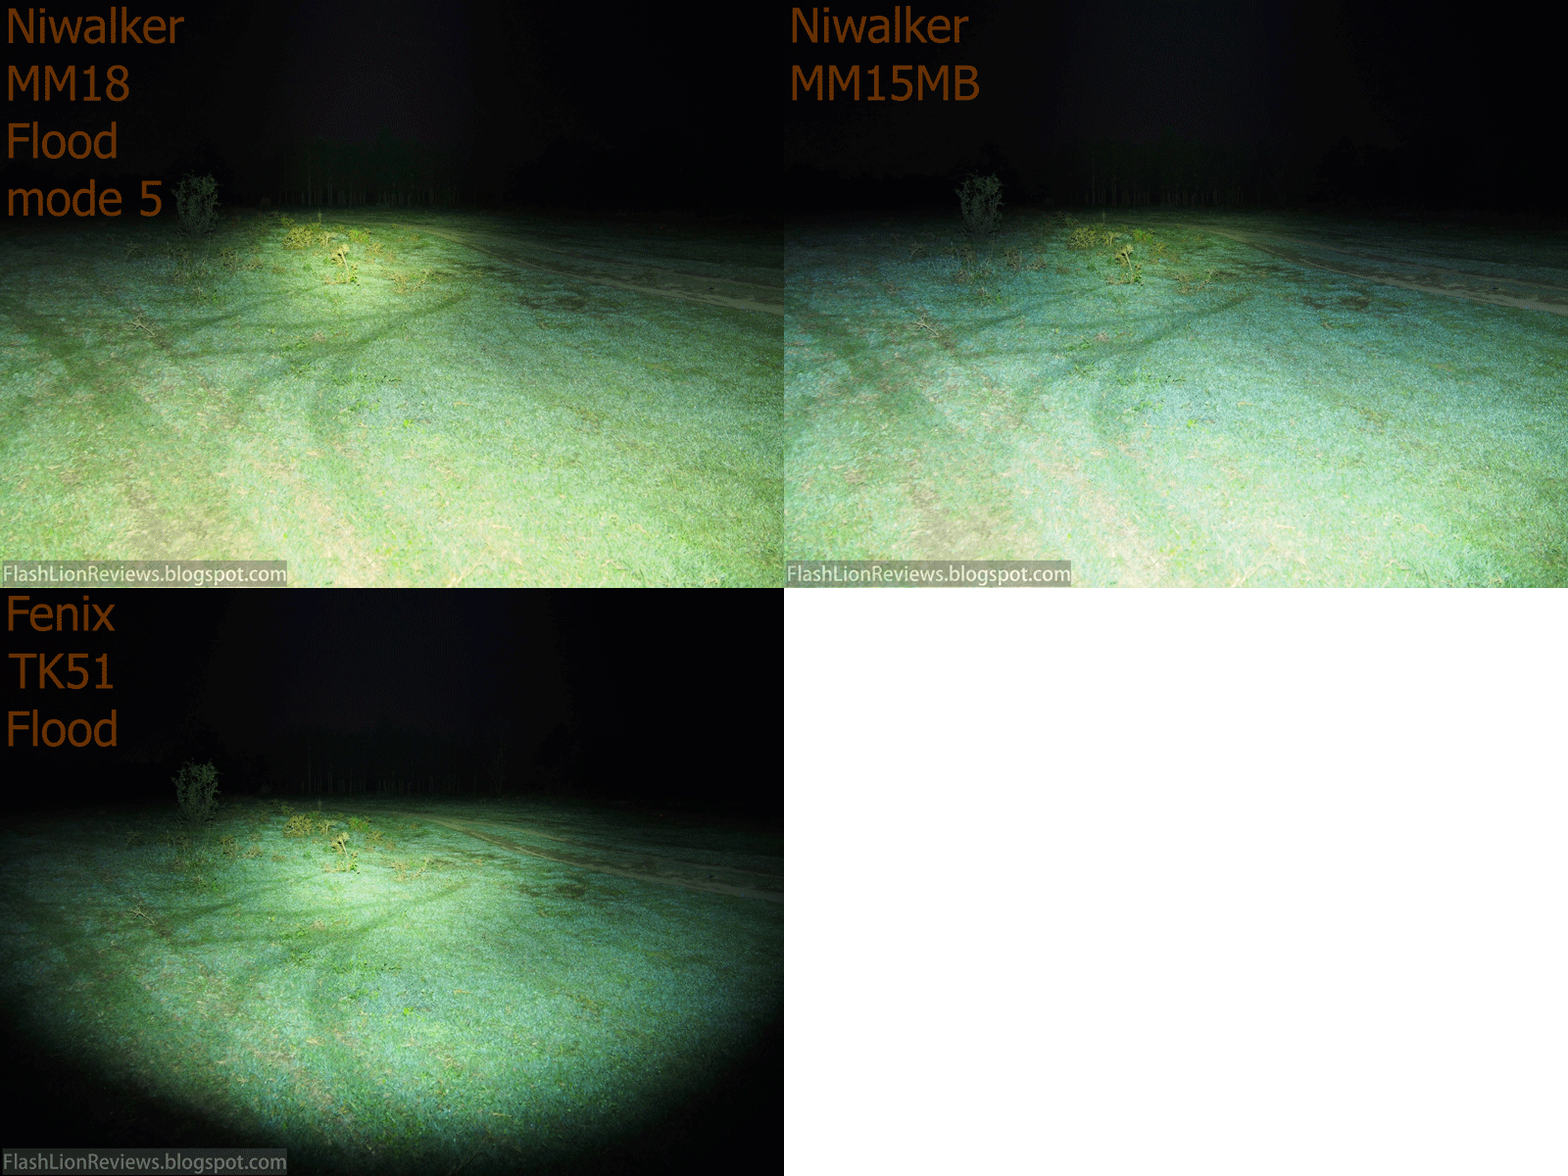
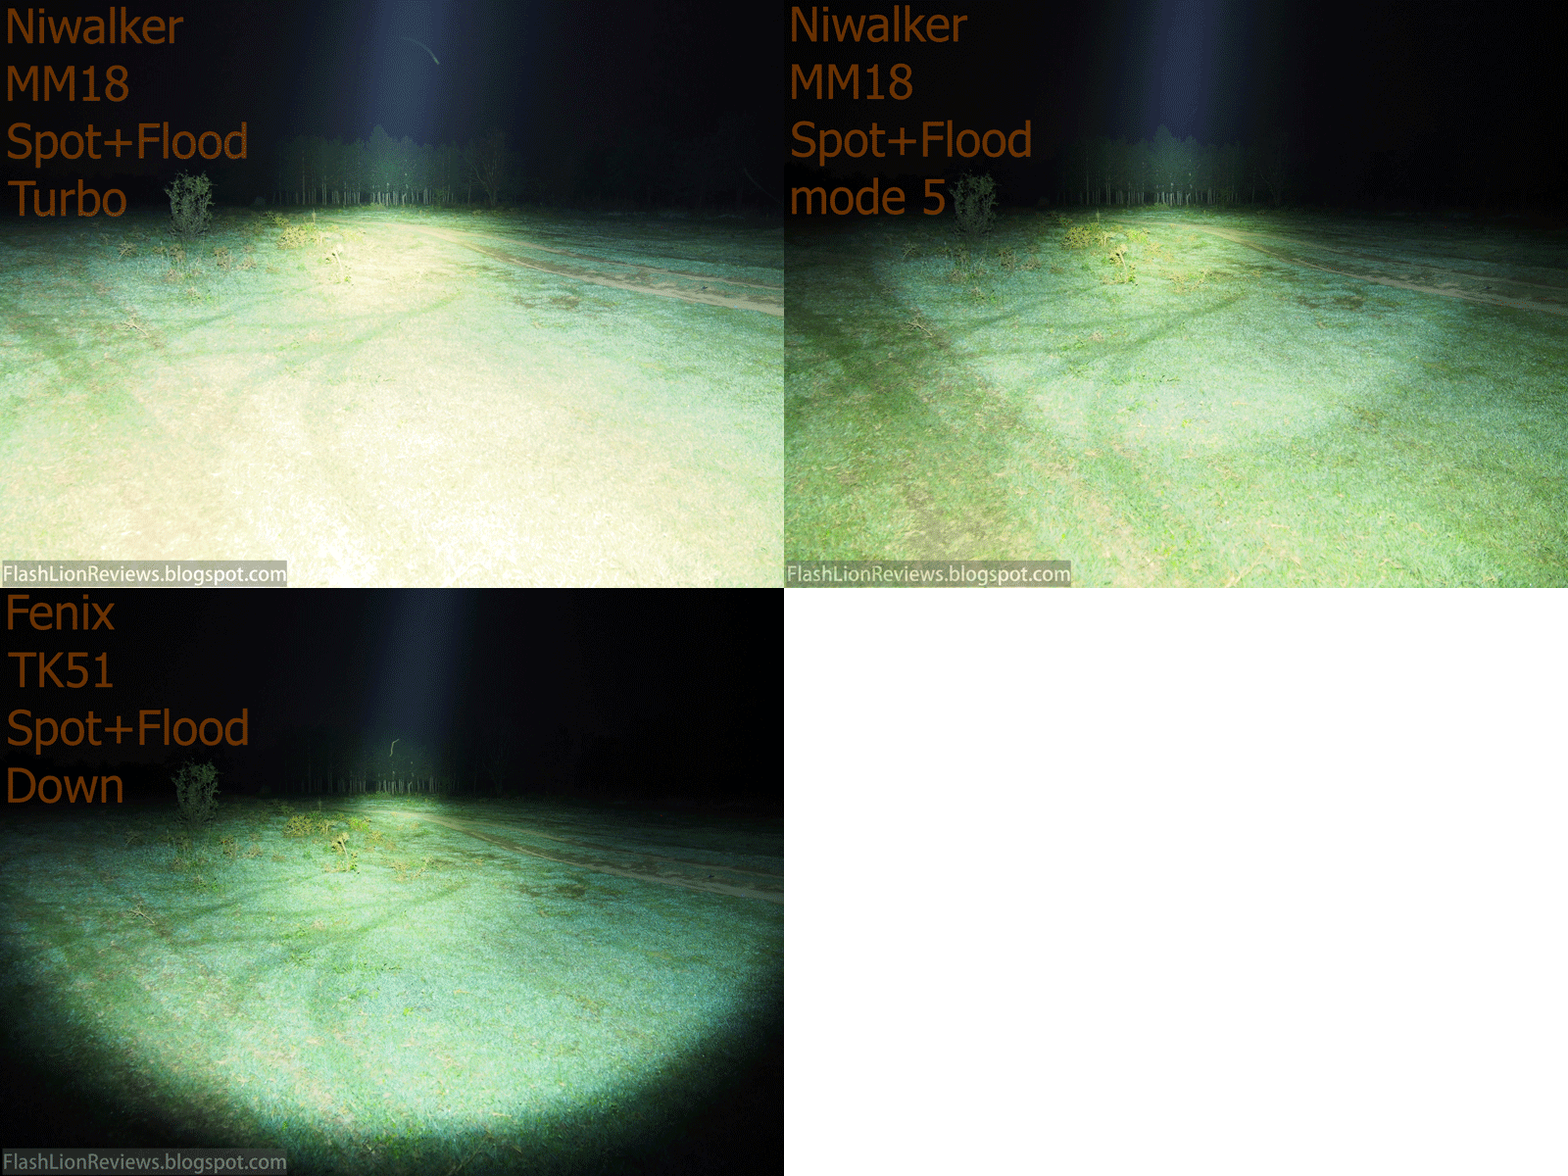
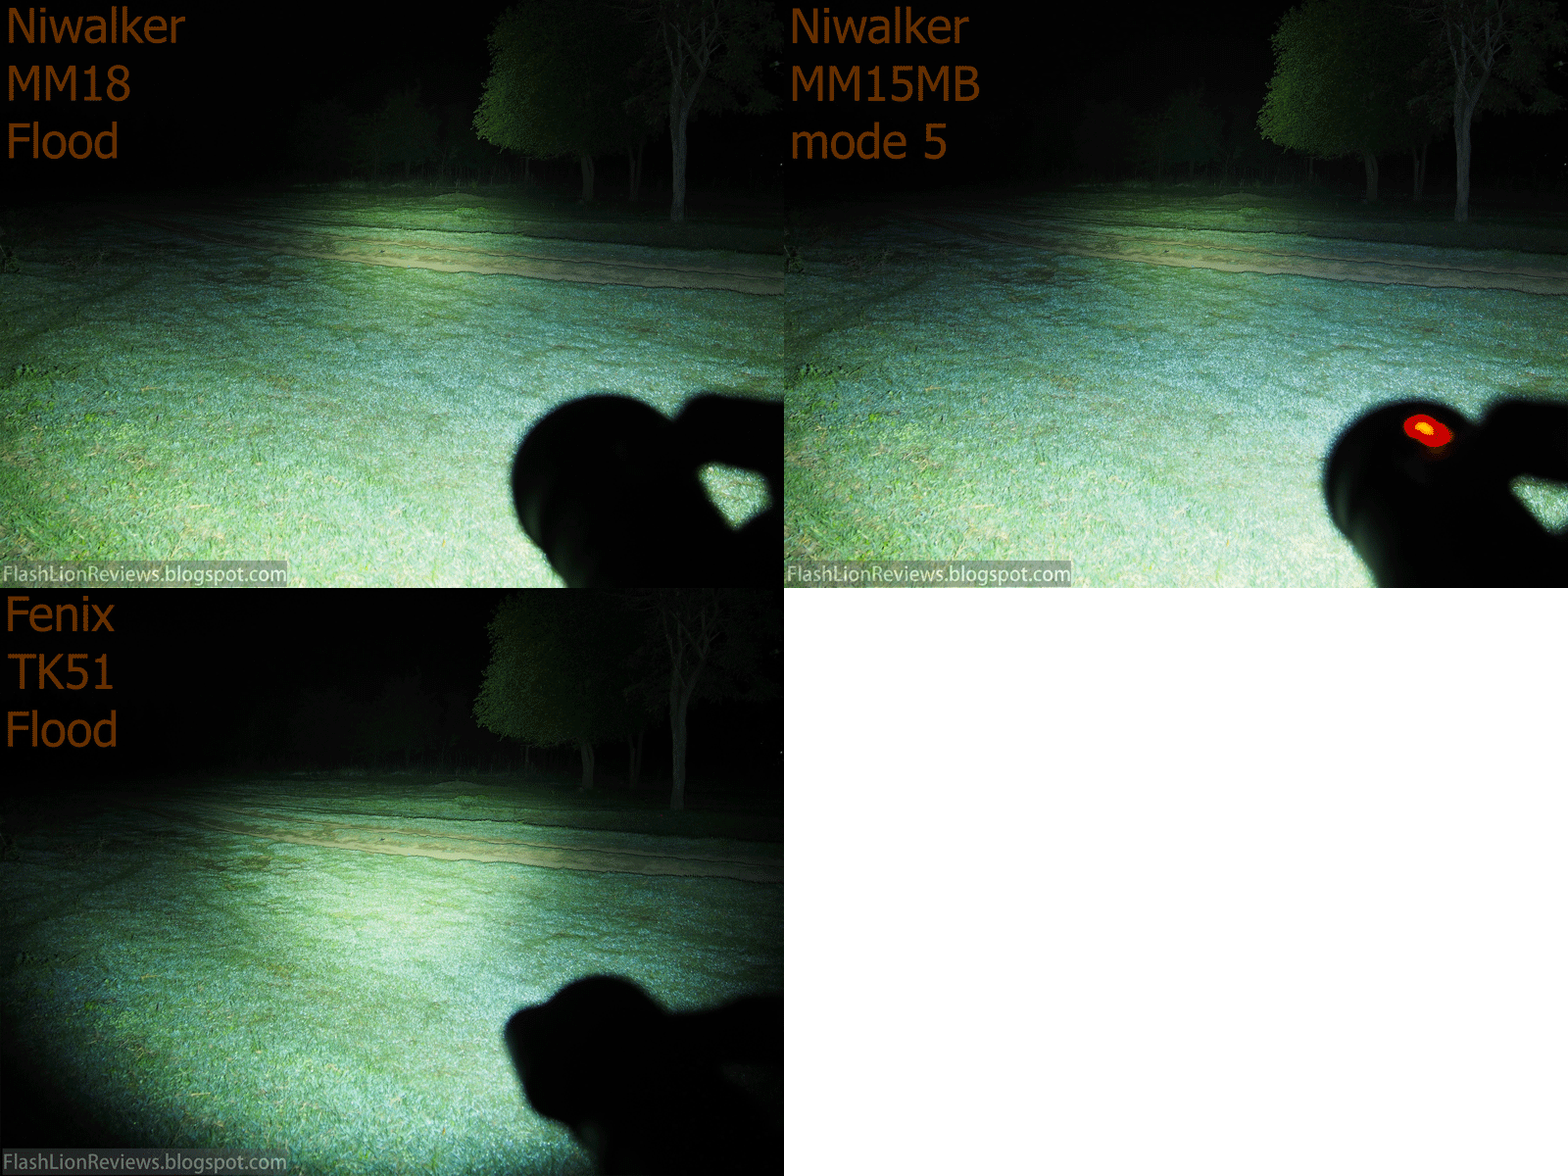
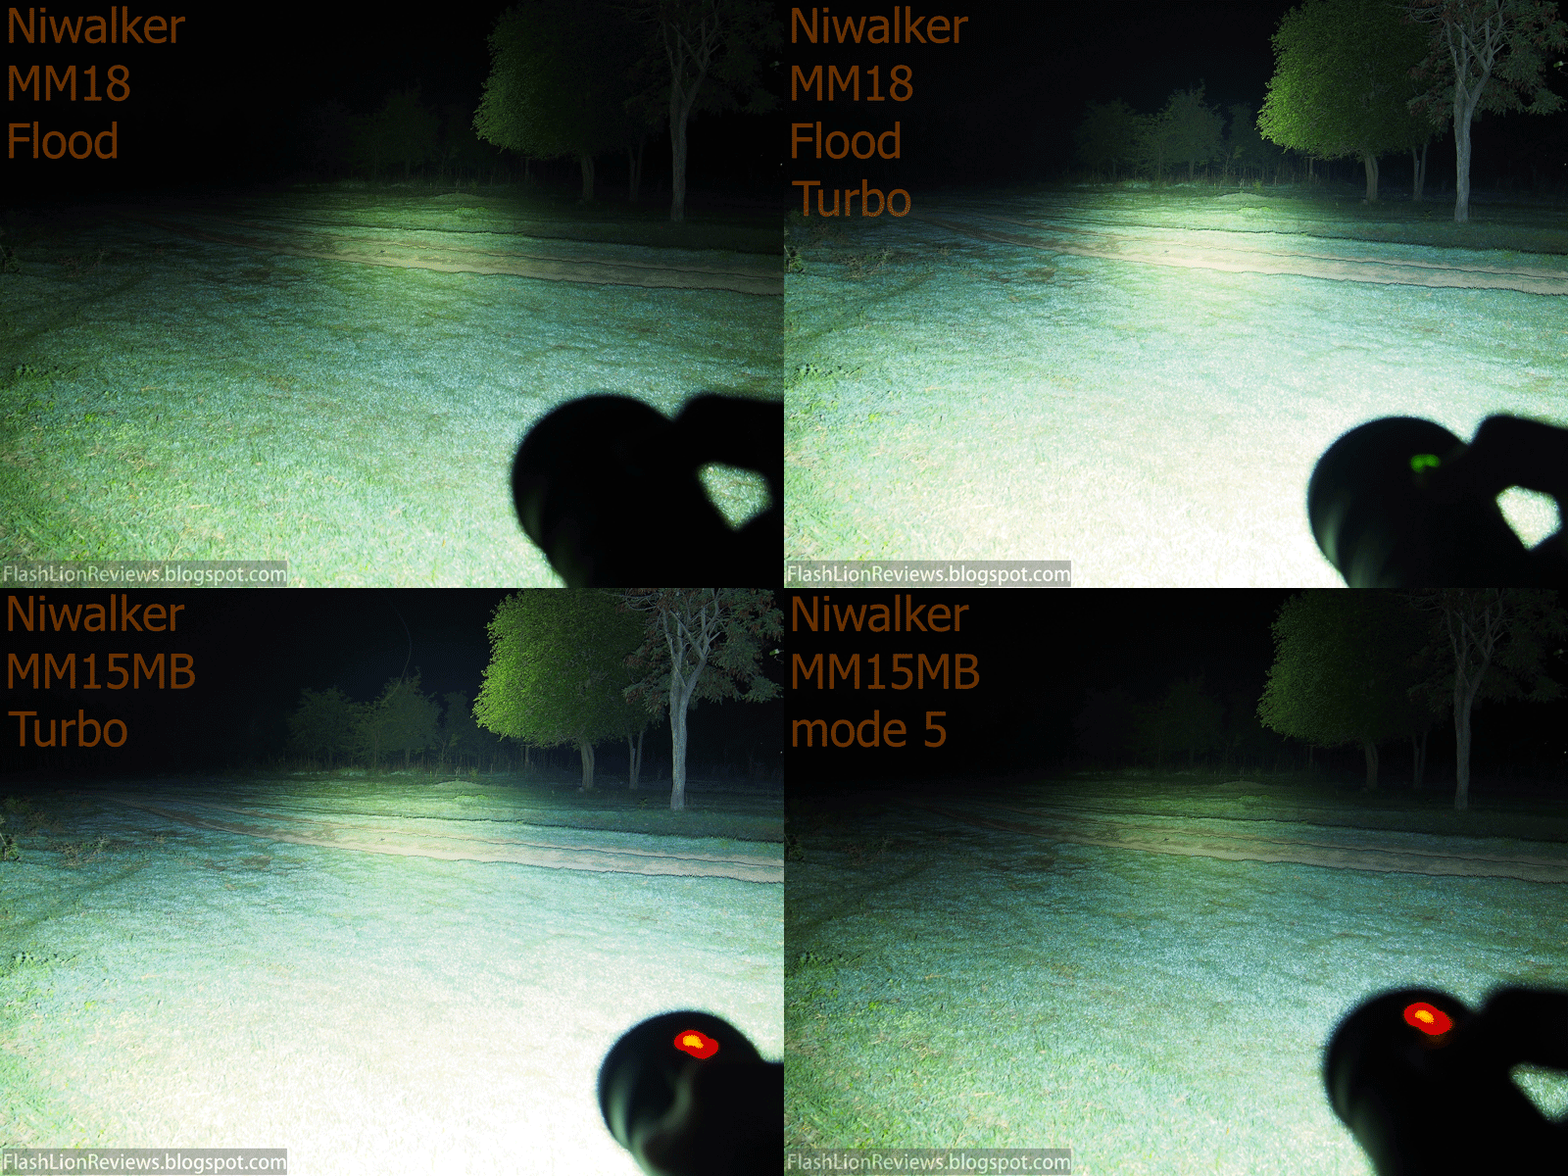
Niwalker MM18 compared to Fenix TK51(another multi-emitter flashlight,which is result of the same idea for a multipurpose beam)
Comparison also with the updated Niwalker MM15MB.
Unfortunately Lumintop PS03 had a strange technical problem and is not presented on the outdoor beam shots.

Spot beam down


Spot beam up


Flood beam
Niwalker MM18 and MM15MB on Max mode.


MM18,MM15MB on 5 mode.(pictures below)

Niwalker MM18 and MM15MB on Flood beam,mode 5, Fenix TK51 Flood


Spot+Flood beam
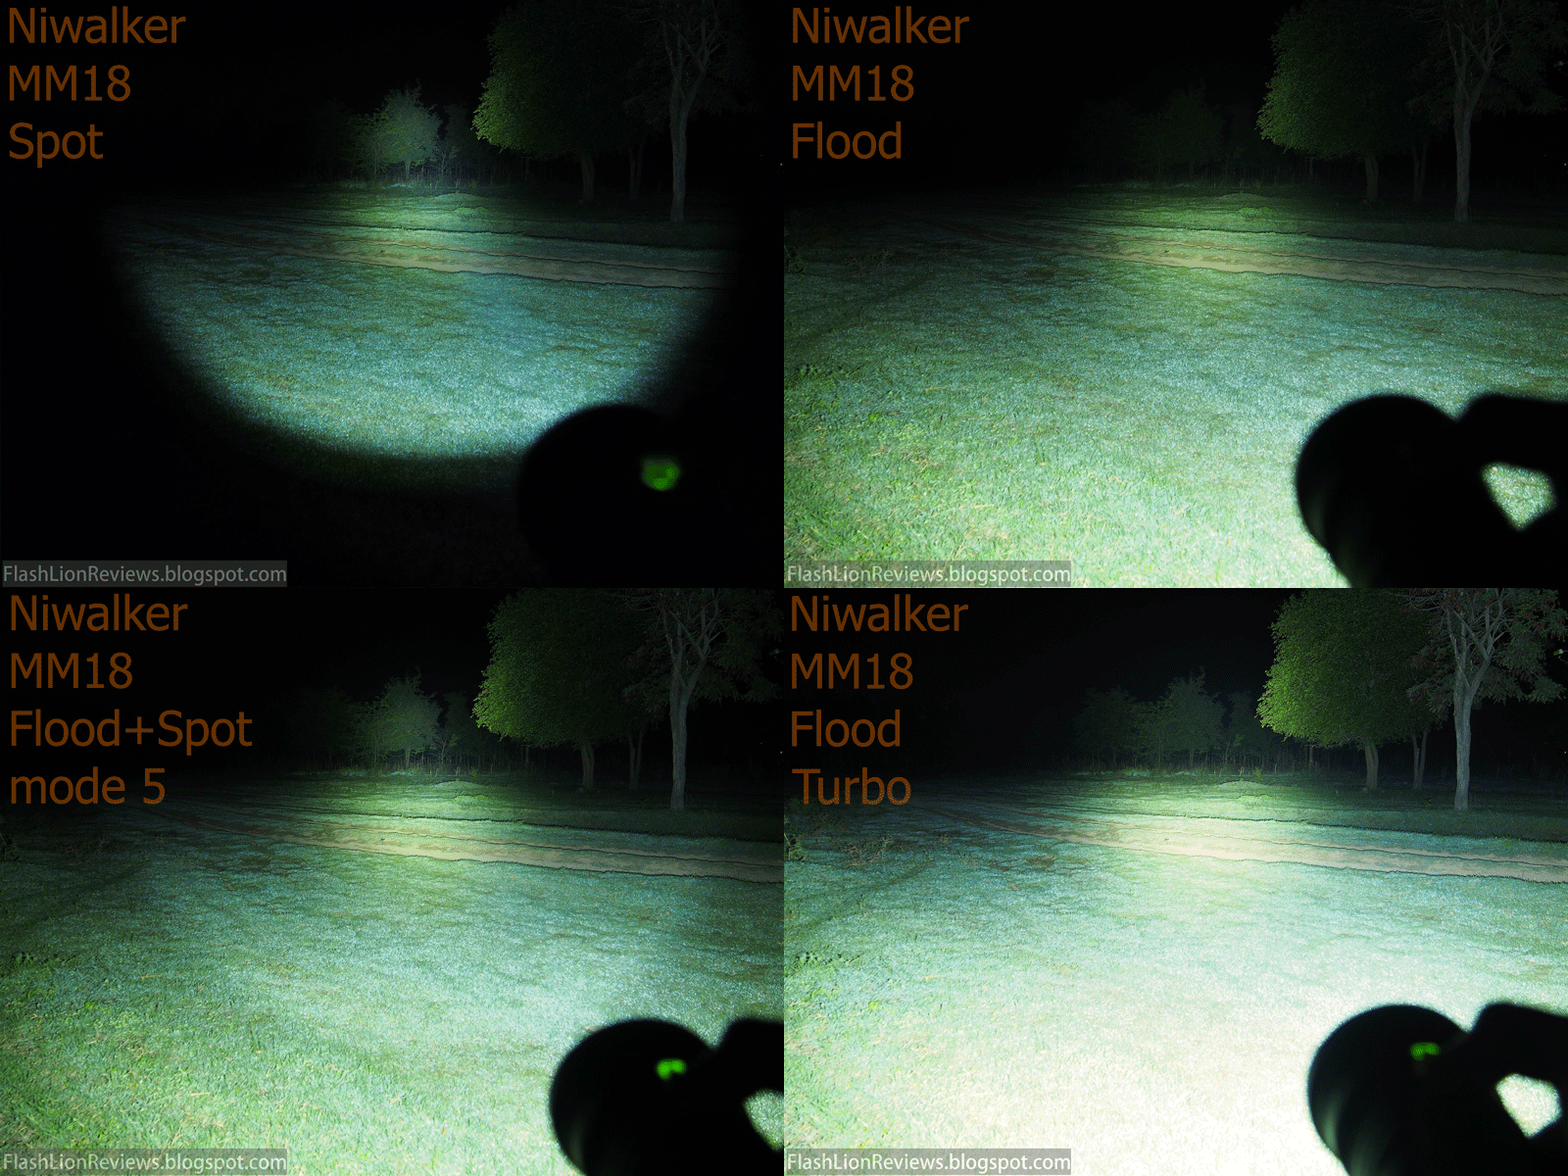
Comparing to the MM15MB,the MM18 has more balanced and easier to use beam.
It is not too wide,which is protecting you from the blinding effect of the reflected 5000+ lumens light from the ground.
You can see it very clearly on the pictures below.


Spot Beam
Closer distance


Flood beam
Closer distance


Turbo modes Flood and Spot+Flood beam


Strong points:
Excellent build quality and machining.Excellent heat transfer capability,thanks to the massive aluminum body and copper LED board.
Wide angle flood light and focused spot light in a single flashlight. Very high max output.Relatively compact for what it gives.
Excellent matte anodizing.Conventional user interface-nothing too complicated,or overloaded.
After some usage,my impression of the different beams is only good,as they could be quite useful outdoor or indoor,providing quality illumination.

Weak points:
Here I should add the very high Standby current on first place.It is consuming as high current as the Low mode.
Please read my notice in the beginning of the review!
I found the indicator lights on the switch a little too bright and often distracting.
The switch covers could be thicker and with a larger diameter,people with big hands will benefit from this.
May not be very comfortable in long periods walking and carrying it,due to its weight.
I would prefer to activate the 6th mode with just one press and hold the switch.Activating it takes some time to get used to.

Thanks for reading!

Thanks to NIWALKER for providing the MM18 for test and review!