Showing posts with label sport. Show all posts

Thursday, July 7, 2016

Olight H05s Active Demo video

Read my full review here-olight-h05s-active-2xaaa-lightweight

Olight H05s Active-lightweight headlamp,Cree XM-L2 LED,powered by two AAA batteries.

Monday, February 15, 2016

Firefly 6S Samples-direct download


Video and photo samples taken with the Firefly 6S action camera.
Firmware version 2.2.
Testing all settings.
Download the samples from the provided links and check them on your computer.This is the only way to see the real performance of the camera.Youtube is compressing the videos,causing bad artifacts and distortion.

To check the different angles of view,you can open two players and switch between them,in order to see the difference.

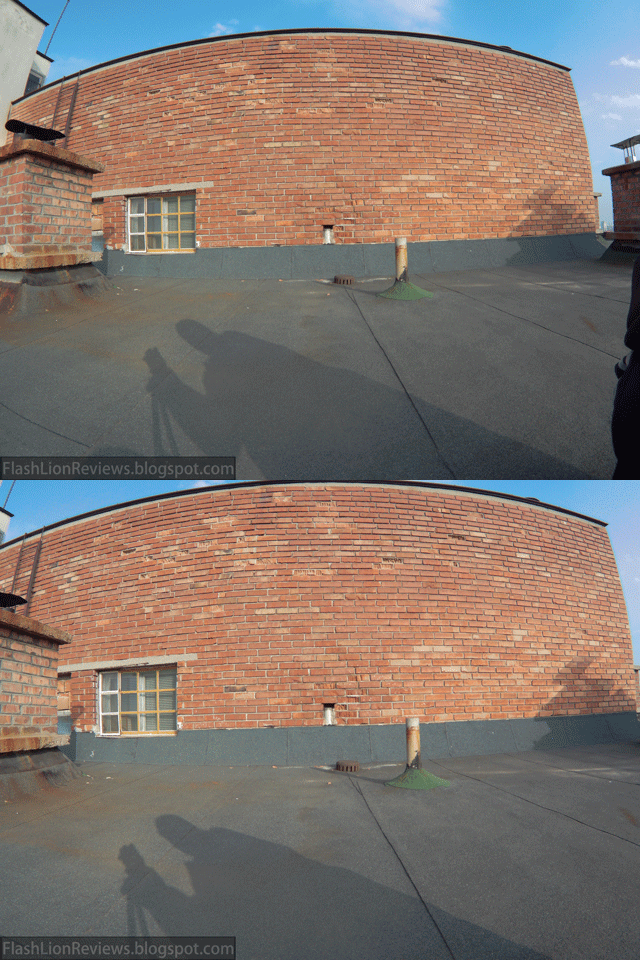
In the first test,I am panning the camera horizontally and vertically in front of a brick wall.
You can see the barrel distortion due to the wide angle lens and the level of compression artifacts-mostly on the ground.


Direct download samples from Google Drive-
(All resolutions tested)
4K- https://drive.google.com/open?id=0B-zkqOV6vJgdd0tXcVQ5c0EzUWM
2.5K- https://drive.google.com/open?id=0B-zkqOV6vJgdSkY1Mmd0ZzFVOHM
1080p60- https://drive.google.com/open?id=0B-zkqOV6vJgdS0JfbmVpU3FmelU
1080p30- https://drive.google.com/open?id=0B-zkqOV6vJgdRnpEWXNLdmk0NkE
720p120- https://drive.google.com/open?id=0B-zkqOV6vJgdS2NxVmJ6SUhtVkk
480p30- https://drive.google.com/open?id=0B-zkqOV6vJgdd3dFbGdxc1Vkd0U

Additional videos:
Rolling shutter test:
4K-  https://drive.google.com/open?id=0B-zkqOV6vJgdWkR6N1BWQW1IcVk

Wide Dynamic Range:
4K- https://drive.google.com/open?id=0B-zkqOV6vJgdMENEWWRNSVpQM0U

ISO:
100- https://drive.google.com/open?id=0B-zkqOV6vJgdaGMzVkhQb1VOLUE
400- https://drive.google.com/open?id=0B-zkqOV6vJgdaVNaNy1JNGxrR28
1600- https://drive.google.com/open?id=0B-zkqOV6vJgdRjhIQVRMWm9xYkk
(ISO was set to automatic on all other videos)(In bright light the difference using different ISO is negligible).
(There is more difference when shooting videos at nigh.I have no suitable night videos to share yet.)

Sharpness:
Low- https://drive.google.com/open?id=0B-zkqOV6vJgdMVlmbDBmZ3hNRXM
Mid- https://drive.google.com/open?id=0B-zkqOV6vJgdVi1QQXNMa29XQm8
High- https://drive.google.com/open?id=0B-zkqOV6vJgdNlJWSDB6eGsyZzQ

Color:
Vivid- https://drive.google.com/open?id=0B-zkqOV6vJgdbTdmSEJZNlFVR1U
Standard- https://drive.google.com/open?id=0B-zkqOV6vJgdck9tNTV5SHZnSUk

Fish Eye Reduction:
4K On- https://drive.google.com/open?id=0B-zkqOV6vJgdREJLb2hrX2ZGWkU
2.5K On- https://drive.google.com/open?id=0B-zkqOV6vJgdX1VQZzNmLUpELVk

Gyro Stabilizing:
4K On- https://drive.google.com/open?id=0B-zkqOV6vJgdSUx3Wi0wY0JfbTA
2.5K On- https://drive.google.com/open?id=0B-zkqOV6vJgdeGxGY2hRNm90UHM

Angle of View:
Large- https://drive.google.com/open?id=0B-zkqOV6vJgdaTFENlNmWHBLZU0
Middle-  https://drive.google.com/open?id=0B-zkqOV6vJgdVDd0MEp5QTdNb2s

In the next test the camera is static on a tripod.
I am throwing a ball to see how the camera will render the motion of a moving object.
Not the best test out there,but still will give us some idea of the camera's performance.


4K- https://drive.google.com/open?id=0B-zkqOV6vJgdNE5PeDd5UjMtZU0
2.5K- https://drive.google.com/open?id=0B-zkqOV6vJgdSnU2aDdqanAyU2s
1080p60- https://drive.google.com/open?id=0B-zkqOV6vJgdSEd5dXNLcXNGUEk
1080p30- https://drive.google.com/open?id=0B-zkqOV6vJgdSXF4d2pNaHViMnc
720p120- https://drive.google.com/open?id=0B-zkqOV6vJgdREttZ0ViR2NGQ00
                 https://drive.google.com/open?id=0B-zkqOV6vJgdTUxkTThSR3lNbTA
                 https://drive.google.com/open?id=0B-zkqOV6vJgdSG8wS2twd1NEbUE
To see the 120p video in slow motion,just play it with a video player like Mediaplayer Classic which slows it automatically.
480p30- https://drive.google.com/open?id=0B-zkqOV6vJgdSklfUXRqT2J4ek0

4K FishEye correction On-
https://drive.google.com/open?id=0B-zkqOV6vJgdOGg0dklFS3NJcms

Timelampse Video out of the camera-
https://drive.google.com/open?id=0B-zkqOV6vJgdenl6d2xjR3pjZjg


I will probably post more videos,once I take some more suitable.
Check this page after some more time,if you are interested to see more samples.

If you like my work,please use the link below,if you decide to buy the camera.
I will not get any commission. This will just help me to get a new sample for testing and review.
Thank you for the support!
BangGood link- http://goo.gl/asjE1E


Fish Eye correction On-Off

Large angle - Medium angle of view

Saturday, November 28, 2015

HawkEye Firefly 6S sport/action/quadcopter camera,UHD capable. Review with Samples Part2

HawkEye Firefly 6S action camera Review
Part 2

Check out the price and buy the camera here- Banggood link

Menu and settings

The camera has built in WiFi,allowing to adjust the position and direction of the visible field,that will be recorded.

The menu interface is not the easiest and simplest.It needs some time to get used to,after trying all features and how to activate them.
There are dozens of options to play with.
Different resolutions,different angles of view,fish eye correction,Gyro stabilizing,sharpness,two color options,ISO,Timelaps video settings,timer for photos...


Video demo of the menu-

The display only shows remaining number of photos in Photo mode. No estimate recording time in video mode.
There is no way to know how much memory has left on the memory card.


The camera has quite good number of different resolution settings:
2880x2160 24fps
2560x1440 30fps
1920x1080 60fps
1920x1080 30fps
1280x720 120fps(this is the slow motion mode) 
640x480 30fps (aspect ratio 4:3)

Bit-Rates(according to Media info software):
4k
2880x2160 24fps/ 24.5Mbps (and stretched to 3840x2160)
2.5K
2560x1440 30fps/ 20Mbps
1080p
1920x1080 60fps/ 20Mbps
1080p
1920x1080 30fps/ 14.7Mbps
720p
1280x720 120fps/ 20Mbps
480p
640x480 30fps/ 3.27Mbps
2.5K Timelapse
2560x1440 30fps/ 23.8Mbps

The Bit Rates were updated with the latest V2.3 Firmware.
Check out the end of the review for download link.

The sensor is made on CMOS technology .
I am glad to note,that I did not find rolling shutter effect in the videos taken with this camera,in my test footage,so far.

Because of the relatively lowe bit-rate of about 24Mbps,and maybe the compression method,there are a lot of artifact when moving the camera quickly and roughly,most noticeable in the sky. I would not recommend to move the camera too quickly while taking videos and also try to move it as smooth as possible in order to get the best result of the picture.

Personally,I do not see much of a difference in the quality between 4K and 2.5K modes.
My favorite setting so far is 2.5K with its 30fps.
5fps more than the 4K for a little smoother videos quite well looking on a full HD monitor.


The 720p mode is only at 120 frames per second(no 30fps or 60fps). This mode is meant for a slow motion mode.Videos are taken with 120fps and played at 30fps gives pretty good slow motion effect. The slowed down picture from the 120fps video compared to 30fps,or 60fps is more clear as every frame is taken with higher shutter speed and less of the movement is lost between the frames. This mode is great for amateur videos,but if you want a slow mo video that impresses with high definition,clarity and sharpness,you have to look elsewhere.
120fps videos taken with the 6S are somewhat low in quality,even the high resolution.Lots of compression artifacts and over-sharpened details. Lots of aliased lines.
Yet,it is joyful to take slow motion videos with the camera and this option with no doubt is a big + for the Firefly 6S.

Timelaps can be taken on 2,5K resolution and below.

The below pictures are after updating the firmware to v2.2
The 4K image was saved as a snapshot in video editing software.
It is actually 2880x2160 stretched to 16:9 aspect ratio.


Click on the image below to see the full resolution snapshots from videos.
4K 2,5K 1080 60 1080 30 720 120 480 30

Here are the full indoor test videos for each resolution.
4K 24fps click to watch the video

2.5K 30fps click to watch the video

1080p 60fps click to watch the video

1080p 30fps click to watch the video

720p 120fps click to watch the video

480p 30 fps click to watch the video


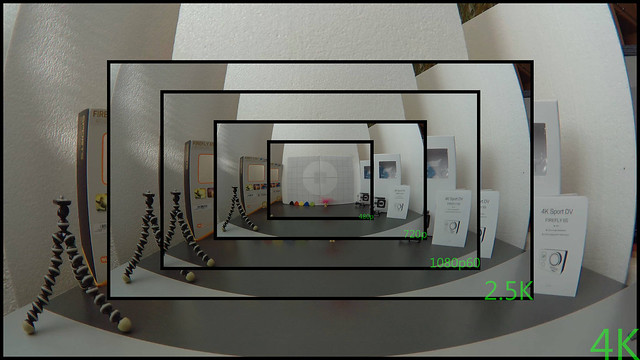
Size of the image(snapshots from videos).
Snapshots from a video editing program,in the aspect ratio they are played on. 


One of the main features and advantages of the Firefly 6S is the Gyro stabilization of the picture. It does stabilize the picture in electronic way and works for both,photos and videos. In order to work,this type of stabilization requires cutting some part of the picture's periphery to be possible to work. This means the angle of view becomes smaller when electronic stabilizing is activated.

There are two options for color adjusting-Normal and Vivid.
I used only vivid so far as it gives nice well balanced colors with high contrast. I see though,high potential in the Normal mode,which reduces the contrast and colors are not so punchy.This is a great setting if you plan to post process the video.
Color rendition in Vivid mode is well balanced,with no over-saturated colors and the picture is nice and natural.

There are three options for sharpening-High,medium and Low,as the Medium seems most reasonable.The low setting gives too soft picture,the High setting increases moire,artifacts and halos.For regular use the Medium setting is my choice.Of course,you can try also the other settings depending on the specific situation.

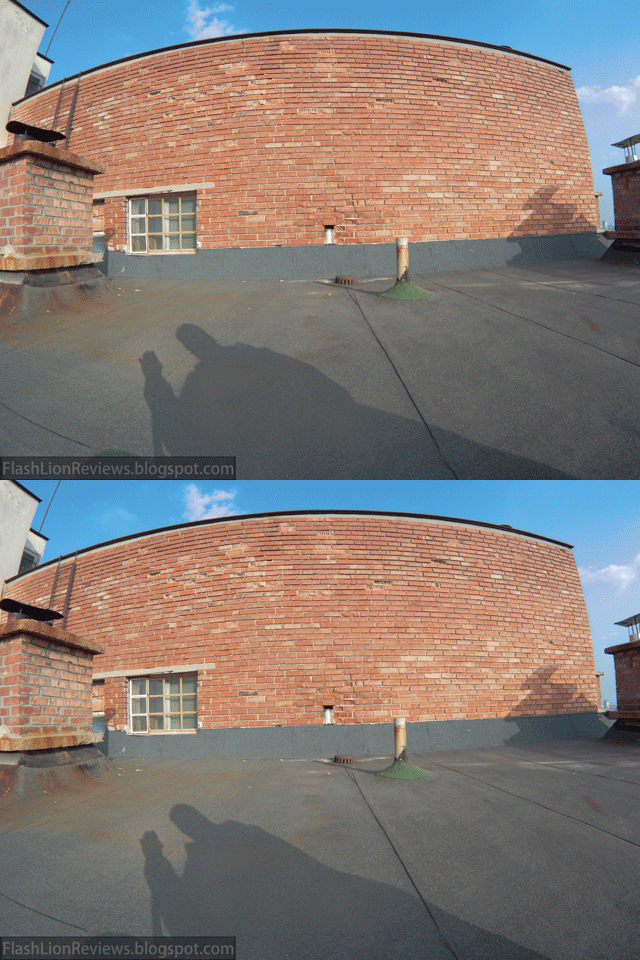
The Fisheye effect reducing option successfully reduces the high barrel distortion,which is usually caused of the wide angle of view.
As the Gyro stabilizing option,this mode also reduces the angle of view,but just very slightly.

One more feature is the WDR-Wide dynamic range.
It does increase the exposure in the shadows for less lost details and better visibility there.

Focusing distance of the lens seems adjusted more to infinity than to taking nice close shots.Holding the camera in my maximum stretched hand does not give quite sharp focused face.
You may need an extender stick for taking good selfies.

Angle of view on the different definition settings.


Large angle-Medium angle of view


Fish Eye correction Off/On


Gyro Off/On


WDR Off/On


The quality of the photos is good and very useful when a wide angle view is required.It is impossible to get that wide angle of view with a point and shoot camera and very very hard to find this wide lens for a crop sensor dslr and mirrorless.
In terms of resolution,pictures are good.Not so good for cropping,but if you use the camera for wide angle shots,you will probably not need to crop the image.
A point and shoot camera,or high level phone is still a better choice for more detailed pictures.
Firefly 6S does a good job dealing with the noise from the sensor.The camera is advertised as a Sony sensor camera.This is a good reason to expect good,low noise results from the sensor. In good lighting picture is clear,good contrast and sharpness(it can be adjusted in three levels from the menu). As expected from the not so big sensor and not that high bit rate,there are noise and artifacts in the shadows and when taking pictures with insufficient ambient light.

Below are some 16Megapixel photos taken with the Firefly 6S.


Snapshots from a 4K video.


Extra Videos

Time laps videos are very smooth and clean of noise.
I feel that this will be my main method of taking time laps videos from now on. It is quiet,the camera is easy to mount,does not take too much attention,does not load too much sliders and rotating timer adapters.
I use it on the 0,5sec setting(it is taking a photo every half second interval). The result is very smooth video,which can be edited in post,for even more speed.


Click below to download the original file-
https://drive.google.com/file/d/0B-zkqOV6vJgdUk5SRDdwU3ZWYW8/view?usp=sharing

Walking with the camera in hand,testing Gyro stabilizing.
These tests were taken before the v2.2 firmware release.


Click below to download the original file-
https://drive.google.com/file/d/0B-zkqOV6vJgdUnJLV0toX1I0LVE/view?usp=sharing


Click below to download the original file-
https://drive.google.com/file/d/0B-zkqOV6vJgdYzNpeHJOakRPalk/view?usp=sharing


Click below to download the original file-
https://drive.google.com/file/d/0B-zkqOV6vJgdRS1NdkhqTFZGMGc/view?usp=sharing


Fishing
I am trying to not shake the camera too much.
The camera was attached with the clip/clamp to my jacket. Not very stable.

Gyro ON.


720p 120fps


Car mounted
 4K footage converted to 1080p 24fps and rotated on 180 degree.
The camera was mounted upside down.
Gyro stabilizing ON.


After using the camera for three weeks,my impressions are quite good. It does meet almost all my expectations.High quality picture,various settings for customizing the picture. I my opinion,the amount of different resolution modes is quite enough and gives you a choice to use the most suited one,depending on the occasion,surely many of us will use 4K and 2.5K all the time.

Am I pleased with the Firefly 6S? Yes.
There are better cameras out there,for sure.GoPro still leads in terms of quality,but let's not forget that the price is often a determining factor and for its price,the Firefly 6S offers quite high value.

Firefly 6S is a good choice for an ultra HD capable action camera-optimal quality of the videos and wide range of features.

Great to know is that the manufacturer HawkEye does care about its product and is frequently updating the Firefly 6S's Firmware. Be sure to update your camera to the latest V2.3 Firmware.
You can download it on the main Firefly 6S website- http://www.cnfpv.com/en/TECH/110.html
The latest firmware is adding some more useful features,as exposure metering option and higher bitrates.
(After testing the V2.3 firmware for some more time,I found the distortion caused by the gyro stabilizing,way too heavy and downgraded to firmware 2.2).

If you found the review helpful,please use the affiliate link below.
I don't make any money from links or coupon codes!
This will just help me to get new samples for review!
Check out the camera here- Banggood link

Check out part 1 of the review,if you missed it- http://flashlionreviews.blogspot.bg/2015/11/hawkeye-firefly-6s-sportaction-camera4k.html

Here is a page with more samples(direct download),that will be updated occasionally- http://flashlionreviews.blogspot.bg/2016/02/firefly-6s-samples-direct-download.html


All videos Copyright. Please don't post them elsewhere without my permission.


Friday, November 27, 2015

HawkEye Firefly 6S sport/action/quadcopter camera,UHD capable. Review with Samples Part1

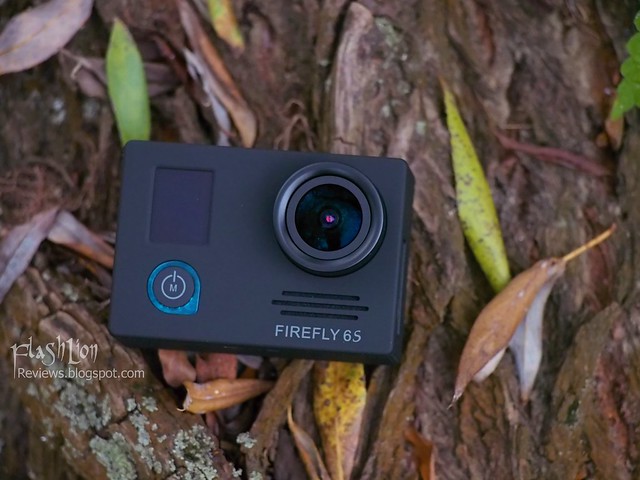
HawkEye Firefly 6S Action camera

Part 1

Hello
In this review,I am taking the opportunity to test and present a typical action camera.
The camera is Firefly 6S from the manufacturer Hawk Eye.
This is a specialized action camera for capturing sport action and any other beautiful moment of life.
In design the camera is a clear clone of the king in this class,the GoPro Hero.In closer look though,there are many differences. Read my review below,to learn more about the Firefly 6S's design,features and performance.

Check out the camera, at Banggood (link)


Here are my reasons to choose Firefly 6S instead of the other more popular sport cameras like Xiaomi Yi and SJcam.
First is the display.The display is usually the thing that consumes most energy from the battery.
The S6 has a small one color OLED display. It does not have a big 2" color display on the back. This on theory means,the energy should be saved for for the more important part of using a camera-longer taking videos and photos.
The lack of display on the back,means also that there is some more free space for the battery.
More space allows using a battery with a larger capacity. The Li-Ion battery used for powering Firefly 6S has 1600mAh capacity,which(if real) is impressive in such a compact device.
After taking a lot of videos,I can confirm that the camera holds up really well,maintaining quite long run time.
About 40 minutes total video time with various settings including timelapse,as the last video was 19 minutes long in 4K format.
I don't have any of the competitors,though and can not compare their results.


The camera has 4 buttons for operating the user interface.
One on the top,one on the front and two on one of the sides.
Both top and front buttons have blue led underneath for indicating the state of the camera-start/stop recording,taking photos,activating Gyro,charging status.

Pressing the top button activates recording process,or stops it.It is used also for confirming the selected setting.
The front switch is for turning the camera On/Off and exit of the menu. It is also used for switching between video and photo state.

The body seems entirely made of plastic with a very nice rubberized finish,which helps a lot for the grip when holding the camera,or when you leave it on a tilted surface.
The lens body feels like a metal material-it's most probably made of metal.

The battery can be charged directly in camera via MiniUSB cable from a USB computer port,or via wall charger.
Very fast data transfer through USB.Much faster than any USB flash drives and card readers I own.


These are the specifications from the box of the Firefly 6S.


Some more specifications from Banggood's website:
Brand Name: Hawkeye
Item Name: Firefly 6S camera
Photo Resolution: 16M/8M/5M,
Video Resolution: 4K@24fps(Quicktime player required);2.5K@30fps,1080P@60fps,720P@120fps;VGA@30fps
ISO: AUTO/100/1600
AV Output Format : PAL/ NTSC
USB Port: compatible with Gopro Gimbals
Support HDMI output:YES
Support max 64G TF card, Class 10
Support WiFi

Specification:
Size: 59 x 41 x 12mm
Weight: 70g
Battery Capacity: 1600mAh (can be detached, compatible with Gopro3/3+ battery)
Working Voltage: 5V
Working + Charging Current: 800mA
Working Time:1.5h
Charging Time: 2-3h
Compressed Format :  H264
Video/ Photo Format: *.MP4 / *.JPG
Color:Black/Golden/Silver White

Optical Parameter:
Diaphragm: F/2.8,7 glasses
Angle: 120 degree level, 170 degree diagonal

Mode:
Video;Photo;Time-lapse video;Time-lapse photo;11 Burst Photo

Buttons:
Power Button:  Press once for power on, long press 3 sec. to turn off, Photo/ Record Mode switch.
OK Button: Start/ Stop recording
Up Button:  Enter menu/ Add options of menu; long press to turn on WiFi
Down Button: Enter menu/ reduce options of menu.


Quality of the lens and sensor is decent,but as usual it could be better.
The lens is very clear,with great anti-reflective coating.
Definitely not a cheap one.There is a shiny spot on my sample..Probably not coated surface,but most important is that the picture is not affected in any way,so the problem is mostly aesthetic.
The sensor also has its flaws.There are few defective pixels,that reproduce the signal in a wrong way and their color is different from the surrounding pixels.They are not visible every time,but in some situations are quite noticeable. Most modern digital cameras have built in software option for correcting/deactivating the signal from bad pixels. Seeing the S6 sensor,I think a bad pixel removal option is needed here as well.


Battery compartment door looks a little tiny.I am not sure if it could resist frequently opening/closing the door.I did not find a need of using a second battery,so I don't open it at all,after the original battery is in it.
The 6S can also be powered from an external battery/power bank through the USB port. 

There is no any kind of anti- water/dust sealing caps for the USB,HDMI and MicroSD card slot.This is not so good,if you do not use the camera in the waterproof case,all the time.


Short video demo of the 6S design-

This is how the packaging looks like.Very sturdy,thick cardboard box.


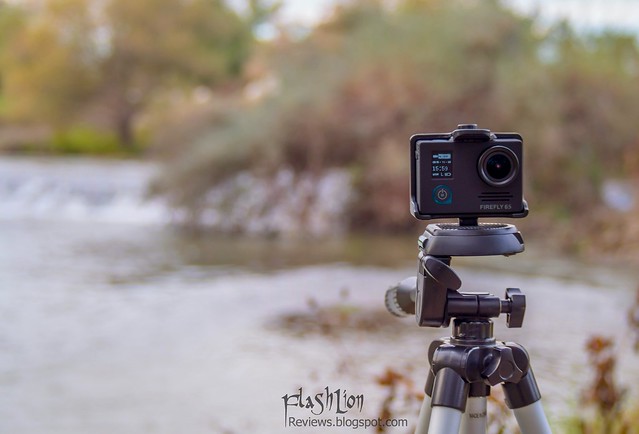
The 6S comes with a full set of different mounting brackets,waterproof case,tripod holder.
The overall quality is good,as some of the accessories are a little better quality,other not so good.
For example,the holder with two tripod holes is somewhat bended and doesn't keep the camera securely attached. I had to use additional parts to prevent dropping the camera when it is inserted in the holder.

There are various accessories for mounting/attaching the camera,also TV cable,nice microfiber cloth.


I have also unpacking video and UI preview,which I will upload later.


Video Samples taken with the Firefly 6S camera.
Testing all the different resolutions.


Click to download the original file-
https://drive.google.com/file/d/0B-zkqOV6vJgdbkdHVWlxRkZYTUk/view?usp=sharing


Click to download the original file-
https://drive.google.com/file/d/0B-zkqOV6vJgdUFhiUXJnWFh1UFU/view?usp=sharing


Click to download the original file-
https://drive.google.com/file/d/0B-zkqOV6vJgdMkxORmhGUjg3OW8/view?usp=sharing


Click to download the original file-
https://drive.google.com/file/d/0B-zkqOV6vJgdb2dKaUFDcV9RZ1k/view?usp=sharing


Click to download the original file-
https://drive.google.com/file/d/0B-zkqOV6vJgdNmhmNzYxM1pUYTA/view?usp=sharing


Click to download the original file-
https://drive.google.com/file/d/0B-zkqOV6vJgdbnN3WnE0Wmhqbk0/view?usp=sharing


Click to download the original file-
https://drive.google.com/file/d/0B-zkqOV6vJgdNk93emxURm9DaGc/view?usp=sharing

 All videos Copyright. Please don't post on other websites without my permission.

The waterproof case seems very good quality.I had no chance yet to test it underwater.
I used it for taking a video of driving a car.The camera was mounted very low,on the exhaust tube level.
Check out these videos in Part 2 of the review,to see how the camera performs in this situation.


The review continues in PART 2.
Be sure to check it out! Lots of video samples and different settings demonstration.

Here is a page with more samples(direct download),that will be updated occasionally- http://flashlionreviews.blogspot.bg/2016/02/firefly-6s-samples-direct-download.html

If you found the review helpful,please use the affiliate link below.
I don't make any money from links or coupon codes!
This will only help me to get new samples for review!
Check out the camera here- Banggood link


Monday, October 26, 2015

NIWALKER Nova MM18 (1xXM-L2 + 2xMK-R)(4sx18650) Review

Important notice:
The MM18 has a very high Standby current draw! Always remove at least one of the batteries,when you will not use it for a few days,or a week.
The green indicator under the buttons will stop flashing when the voltage of the batteries is low. It is important to take the batteries out of the flashlight and to recharge them.
Leaving the batteries in the flashlight for longer time is highly possible to kill them and has following issues(could be dangerous)when you recharge and discharge them later.

If you are not used to check the flashlights and batteries every day and to know approximately how much charge is left in the batteries,it is highly recommended to use only batteries with a built in protection circuit.

Quite busy,I left two Niwalker flashlights unattended for a few days and until I notice,I lost 8 batteries!
There is no Low voltage protection to stop full discharge.The MM18 discharged the batteries down to 300mV each!! This is 1,2 V total.
The flashlight has low voltage protection while turned On and also prevent activating the light when the battery voltage is low.However,it will continue to discharge the batteries until they are absolutely empty,while in standby state!
The MM18 is a great flashlight in use,but please keep my recommendation in mind. Lets keep our hobby safe.

Review

Niwalker is one of the manufacturers with different ideas how a flashlight should look like.
Each one of their flashlights has its own character and specific appearance.
The MM15 model is one of the most popular fully flood beam flashlights with a great wide angle,warm white beam,thanks to two MT-G2 LEDs.
This year Niwalker is updating the MM15 model and even more importantly is releasing a new "multi-task" model called MM18.
In the review below I am reviewing the Niwalker MM18. I will try to cover all important characteristics with important info about the run time performance.
Enjoy!

Specific for the new model is the multi-cone reflector with three separate LEDs.
One Cree XM-L2 and two Cree MK-R emitters.35mm diameter smooth reflector for a well throwing focused beam.
Two 25mm textured reflectors with the MK-Rs for a wide floody beam.
A promising combination for a multi-use flashlight.

The lighting modes are controlling by two momentary/electronically operating side switches.
One switch for the throw beam and one for the two flood beams.
Every of the switches work independently of the other,with no interacting their operation at all.

The UI is the same for both buttons. 6 brightness modes for each beam plus Strobe,SOS and Beacon.
The highest 6th mode and the flashing modes are hidden and can be accessed only by quickly pressing the switch two or three times.
So,as in all premium flashlights,you don't have to go through the all modes every time when you want to switch the mode.
This makes the UI a little easier to use.

Here is a picture from the user manual describing all modes-their lumen output and peak beam intensity.
Note that the index for waterproofing is IPX7.

The MM18 net weight is ~500 grams. Add four batteries ~190gr to get the full weight ~690 grams.
Definitely a solid flashlight. According to the specifications,there is a large copper heat sink pad under the LEDs for optimal thermal conductivity.
The aluminum body seems also quite thick for good dealing with the heat.


The MM18 comes in a sturdy sport bag/holster. No cardboard box.
The holster has impressive amount of pockets. In some of them are placed the spare parts and some tools.
Standard accessory is an aluminum handle,if you prefer carrying the flashlight this way without holding the body,which gets quite hot while working on the highest mode.
There are two screws for the handle and tool for mounting them.
Spare O-ring and nice lanyard are also included.

Here is the flashlight disassembled on two main parts.
Four high drain 18650 batteries are needed for powering the MM18.
The four 18650 batteries lie in a holder,which unusual is stationary mounted to the head.
The batteries are connected in series,providing high voltage for the multi-core MK-R leds.

The fixed holder is saving us some troubles when inserting the batteries and also saves some of the parts needed for a good electrical connection with the head.
The electrical connection is through the metal sticks.Physical lock out to disconnect the Standby consumption is not possible.
Due to the fixed battery holder,inserting the batteries takes a little more effort.
The space is well designed for unprotected batteries and they fit normally.
The edge of the battery tube has well rounded end edge for smooth battery inserting,but even that the batteries get scratches from the contact.
Inserting protected 18650s is also not a problem,as I managed to insert a protected Keeppower 3400.
If you use protected batteries,more care is needed not to tear the wrapping.


All batteries are in the same direction-with the minus pole to the flashlight's head.
There are four springs at the head end of the holder.

A nice close up showing the impressive anodizing,the level of the switches and their protruding.
You can see also the anodized square cut threads.

The overall machining of each parts is excellent.Very precisely rounded or bevelled edges.
The only thing I found a little contrasting are the two edges,cut for opening space for the handle.
As you can see on the picture,they are fairly sharp and I would like them rounded as the rest of the edges.
I can feel them with my thumb,but its position is usually over the buttons and then the edges are not noticeable,at all.
Impressive anodizing all over the body with the specific for Niwalker fully matte black finish.
I don't have any critique about the design other than the one I pointed above.I found it comfortable and really well looking at the same time.

Handle mounting point (picture above). Tripod screw mounting point(picture below)(does not fit all tripods).
There is no any kind of anti-roll designing. Only the handle could stop the flashlight from rolling away,if left on its side.


The switch covers are relatively small. I found them a little smaller than needed and in my opinion people with big hands will need some time to get used.
I also did not tested how is the operating when wearing gloves.
The switches have enough move to feel their pressing.They produce audible sound,which also helps.
I have some concerns about the silicone covers.They look too thin for heavy usage. I can't do wear resistant tests,but don't recommend pressing the switches with nails often,etc.
The silicone covers are also semi-transparent,allowing back illumination from the status LEDs-red(low battery voltage),or green(when the light is On).
Every of the indicator leds shows the status only on its respective beam,independent of the other beam.
Both switches are flashing every three seconds,which helps locating the flashlight and switches in the dark. Initially both indicators blinks simultaneously,but after turning ON/Off one of the beams,they blink in different time,which results in more(double) flashing.If one is Off,the other is On.This could be very distracting for the peripheral vision,sometimes.
The switch which beam is activated stays constantly green,until the beam is On. This will help to find the switch in the dark,when changing the mode is needed.
The switch functionality could be locked by triple clicking the selected switch.Locking have to be repeated also for the other switch,if you want to lock it,too. In lock out state,the flashing indicator LEDs are inactive.

Very clean high transparency glass lens with anti-reflective coating on the front of the head.
You can hardly say it is there. ~65mm diameter of the lens.

A little unusual,but beautiful looking reflector.

Wide flood beam thanks to the two MK-R emitters mounted under shallow orange peel reflectors.


Run Time Performance

The MM18 provides quite a lot combinations of two different beams-spot and flood.Each beam with 6 different brightness levels.
As usual I tested the flashlight on its highest output,as this time I tested also the lower 5th mode,because of the significant difference with the 6th mode,
which is more like a Turbo mode(it is not in the regular mode sequence).
The total curves in the graph below are five.
Flood 5 and 6 mode. Spot 5 and 6 mode. Flood+Spot 5th mode.
The results are very interesting and somewhat unexpected,especially comparing the Flood and Spot beam.
Lumen measurements(measured by me with not laboratory calibrated,or designed integrating sphere).
All lumen measurements and run time tests taken with Keeppower IMR 3000mAh batteries.
Flood modes: 1= 1Lm ; 2=11Lm; 3=149Lm; 4=648Lm; 5=1645Lm; 6=5070Lm(5190Lm initial)

Spot modes: 1=1Lm; 2=13Lm; 3=185Lm; 4=669Lm; 5=980Lm; 6=1300Lm

Flood+Spot mode 5=2410Lm
Flood+Spot mode 6=5540Lm

Pretty well spaced modes and lots of mode and beam combinations that should suite almost every scenario.

The MM18 features thermal triggering brightness step down,which has the purpose to allow you to use the max output as long as possible,without worrying of flashlight overheating.
Unlike the timed step down,this type of step down controlling will/should not decrease the brightness,if you use it in the cold weather outdoor and the flashlight is not as hot as,if used in the hot summer days.
For example,a timed step down decreases the brightness,even if the flashlight is frozen.

To get the optimal output results from the LEDs,I used a small computer fan to flow fresh air around the flashlight,which is mounted and stays static through the whole test.
The thermal step down was presented on the 6th mode Flood beam.The protection triggered after about 9 minutes on this mode.
Even with the external cooling,the MM18's head was hot after 5 minutes,as after that it becomes really hot and not recommended to keep your fingers ,or objects in contact with this part of the flashlight.
Here the included aluminum handle may come in use.
I am glad to see the heat is not excessive on the battery tube,which is important for the batteries.
On the other modes tested,with the external cooling the heat dissipation was pretty good keeping the temperature in normal ranges.
What surprises me is the run time difference between Flood and Spot beams.
Even the lower output and lower voltage required of the XM-L2 LED,the Spot beam times are much shorter than what Flood beam shows.

Current draw measurements:
Flood: 9mA / 12mA / 60mA / 260mA / 780mA / 4350mA
Spot: 9,2mA / 12,4mA / 93mA / 470mA / 750mA / 1170mA

For best performance,it is highly recommended to use high drain compatible IMR/INR batteries from a good brand.
All batteries are connected in series,which requires to match the voltage on all batteries.
The MM18 features also a low voltage protection,which actually works and works properly.
The protection kicked in in every of the tests,leaving the batteries in save condition with quite enough resting voltage.
Voltage on every single battery after the test was ~3,2V. A well working LV protection is really appreciated and I like the safety it gives,allowing me to use unprotected batteries without over-discharging them.
The indicator LEDs under the switch covers also alert for low battery voltage,but in my tests they did not give accurate information about the battery discharge level,as the RED light was On about half the run time.

As any other flashlight controlled by an electronic switch,the MM18's driver circuit requires a certain amount of current while turned Off (Standby mode).
There are many discussions on the forum about the effect of the high parasitic standby drain.
Testing the MM18,it shows the highest stadby drain from all flashlights I have tested so far.
Standby current 5,8mA (10mA with the green indicator light On).
In switch lock out mode the current is much lower 0,85mA(which is actually still much higher than the average).


Beam Shots

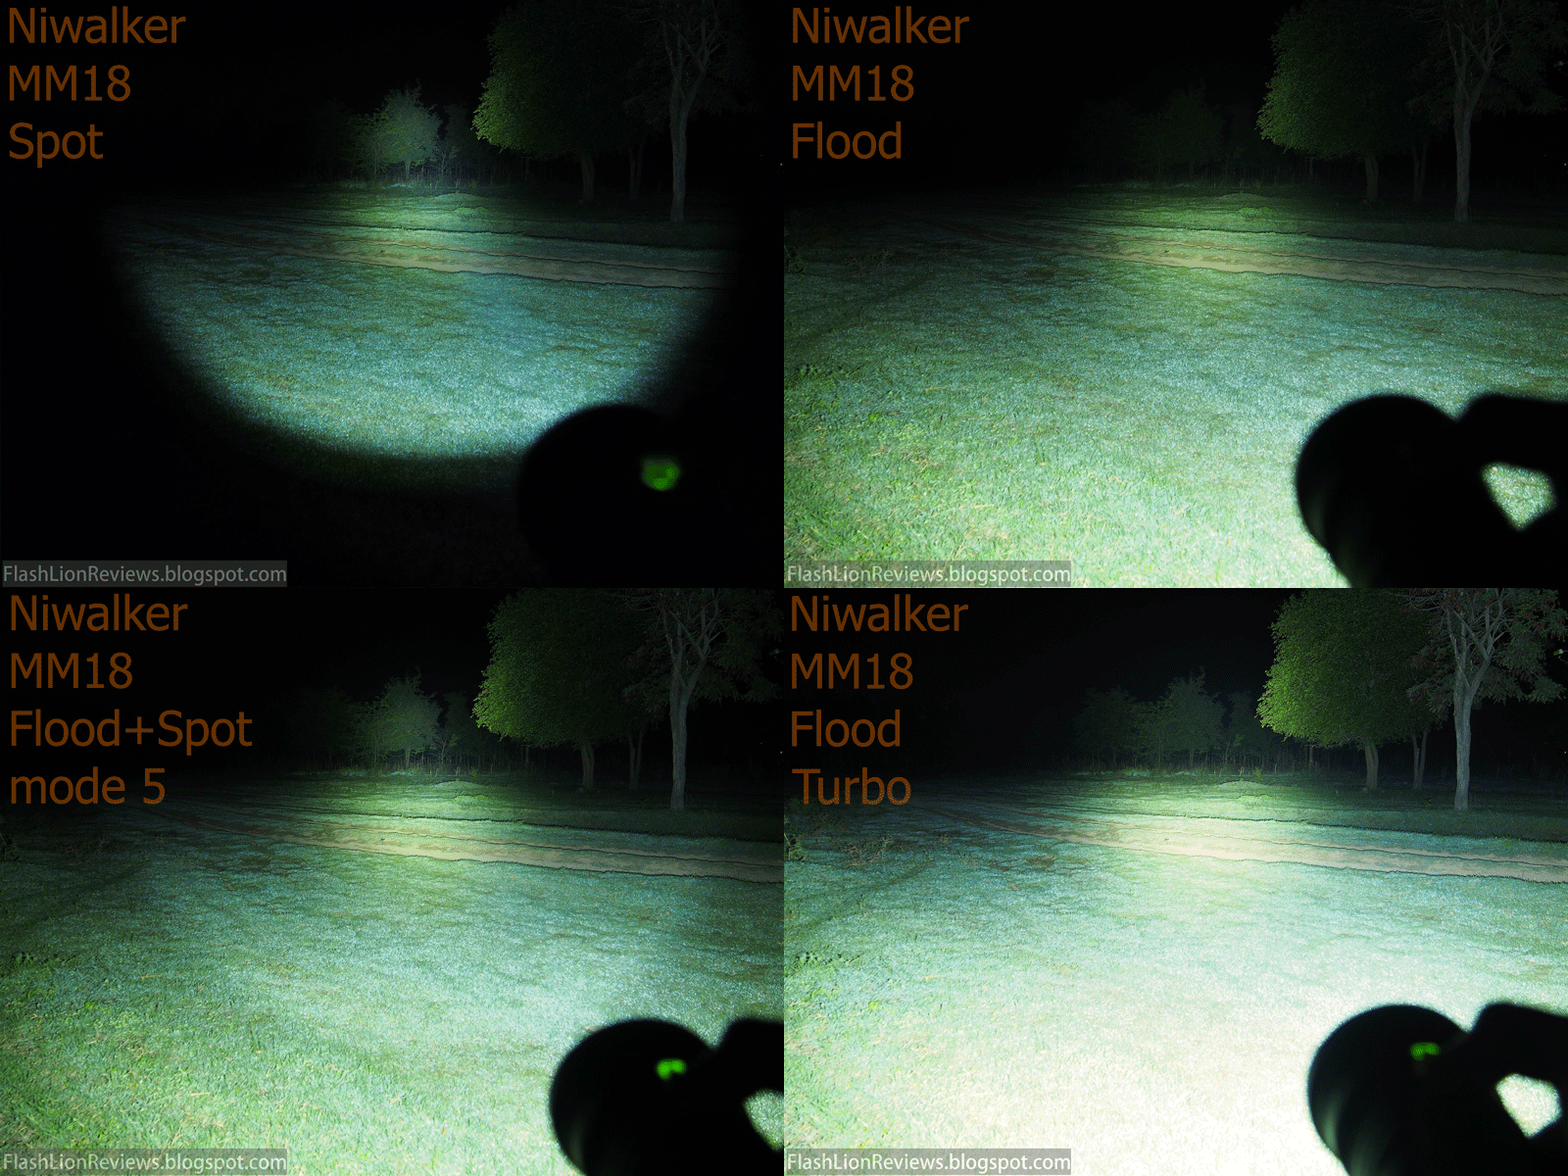
The light from the two beams is different color temperature.
The Spot beam produces cool white light. The flood beam light is warmer,I could say neutral white.
Beam profiles are clean,with hardly noticeable artifacts,mostly if you hunt on a white wall.
There is no visible greenish,or bluish tint in regular use.

/I did all possible to represent the real beam tint on the pictures I show in the review.
However it's hard to judge for the tint only by the pictures.There are too many factors that could affect the color reproduction-screen brightness,white balance setting,contrast,etc.
The tint is also depending on the exposure time of the picture./

Indoor Beam Shots
1/6 sec


1/6 sec

1/50sec

1/50sec

1/200sec


Outdoor Beamshots

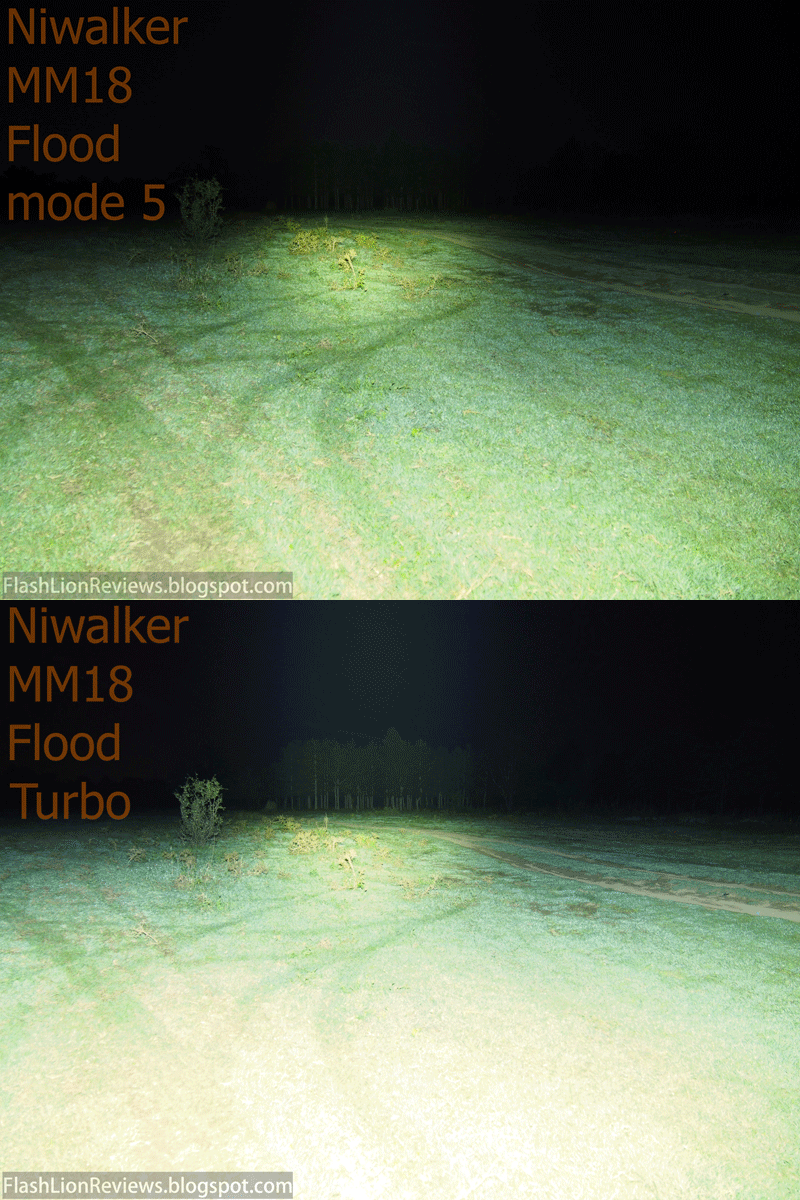
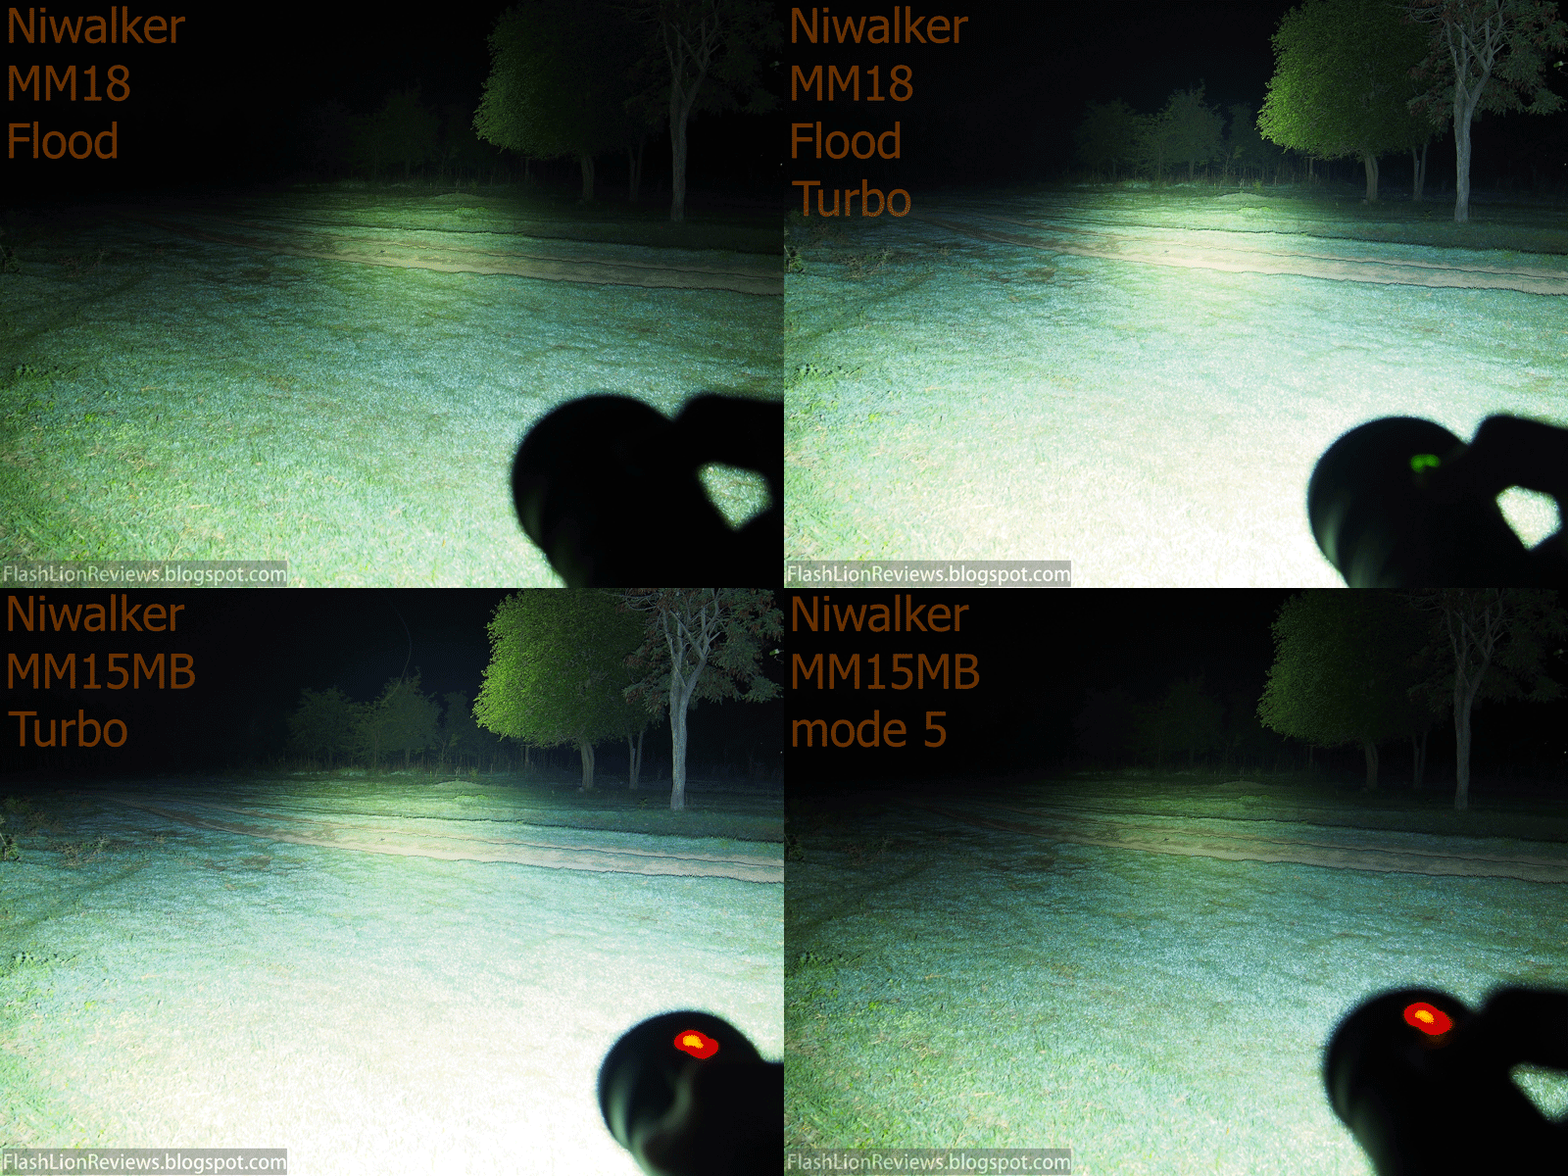
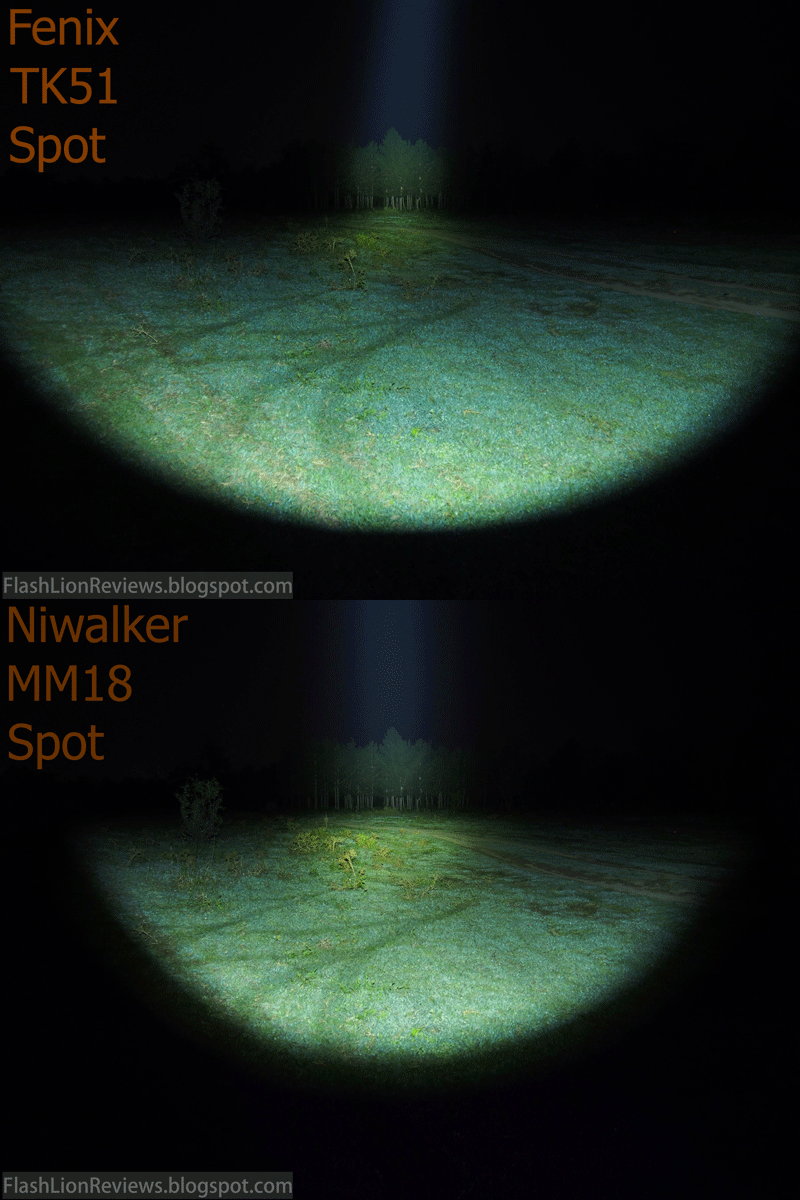
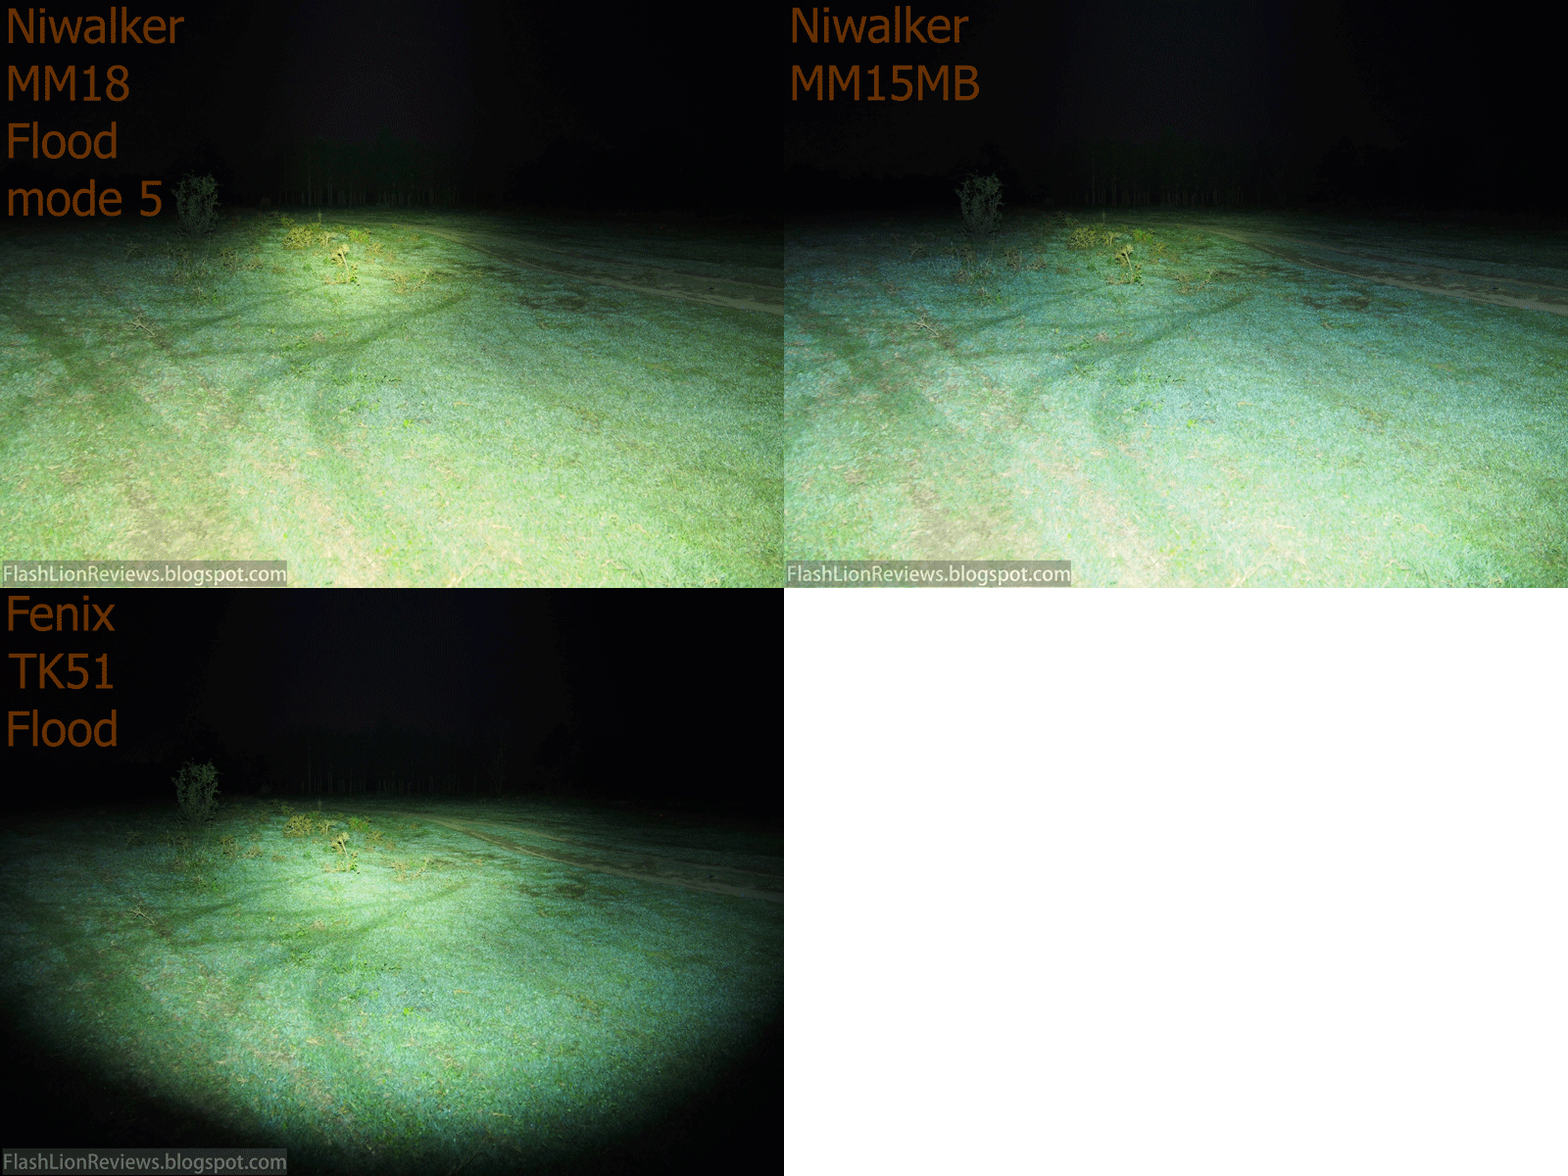
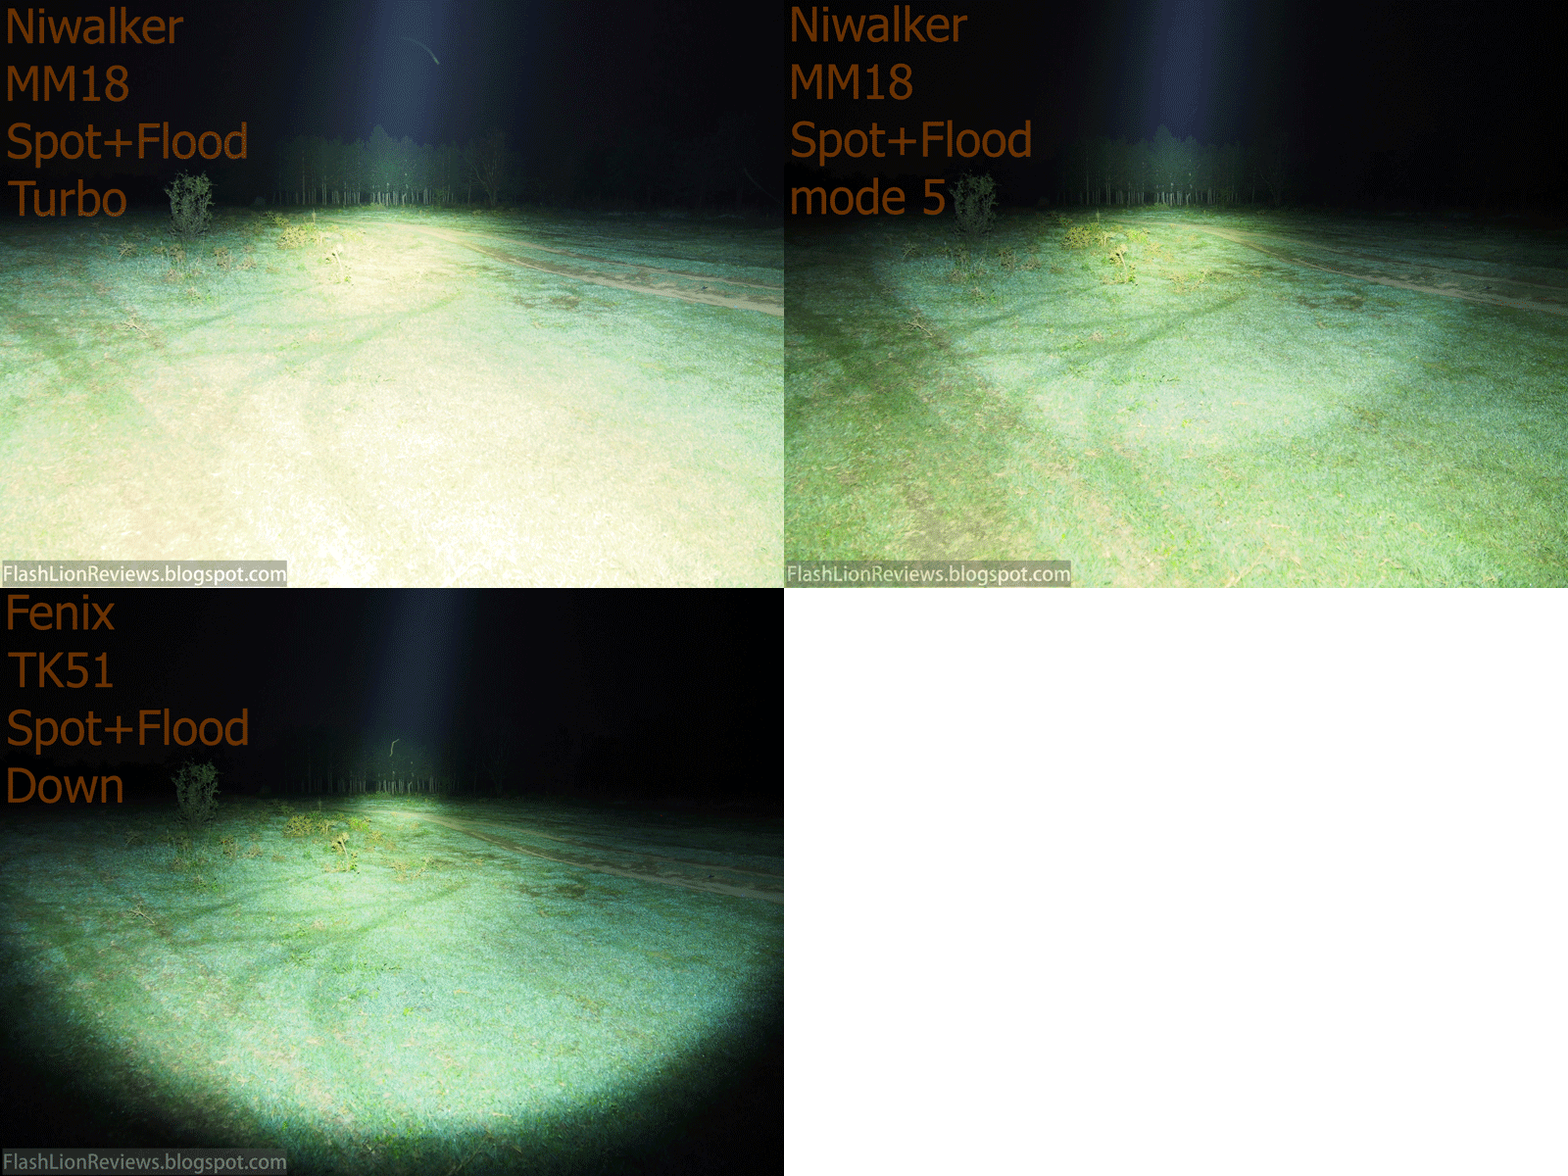
Niwalker MM18 compared to Fenix TK51(another multi-emitter flashlight,which is result of the same idea for a multipurpose beam)
Comparison also with the updated Niwalker MM15MB.
Unfortunately Lumintop PS03 had a strange technical problem and is not presented on the outdoor beam shots.

Spot beam down
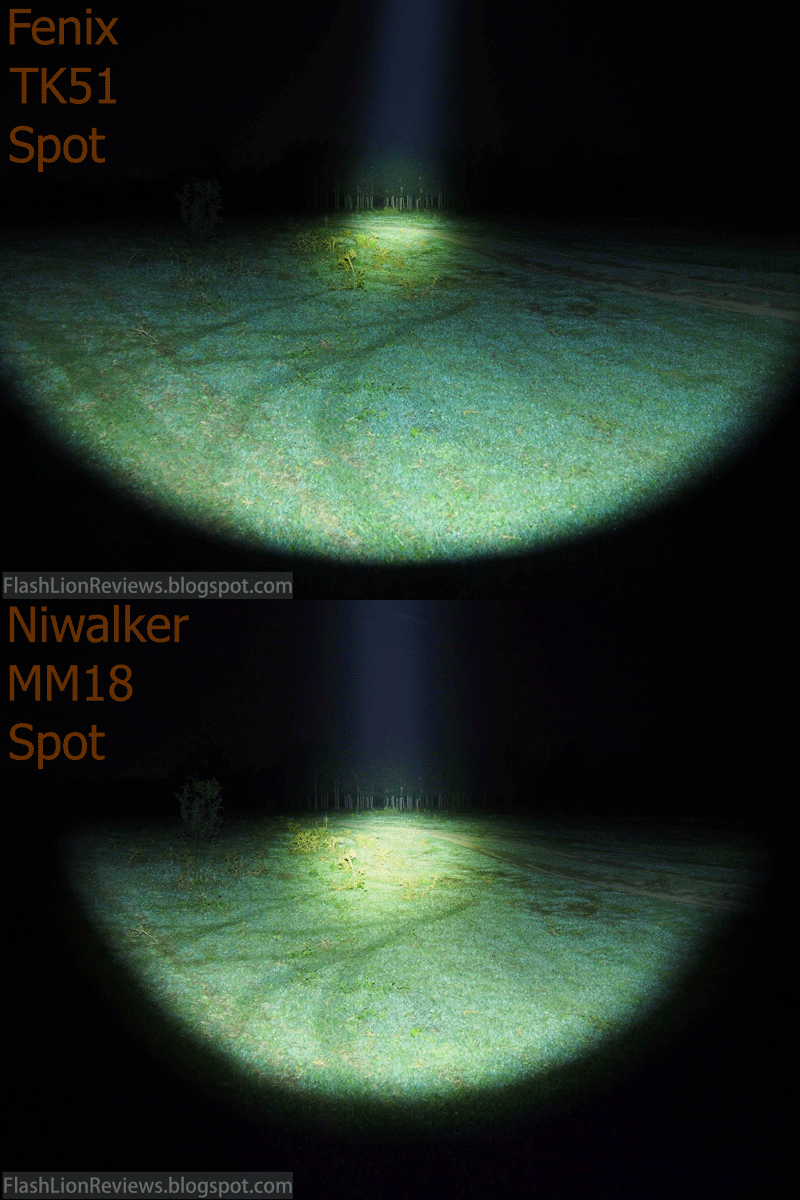


Spot beam up


Flood beam
Niwalker MM18 and MM15MB on Max mode.
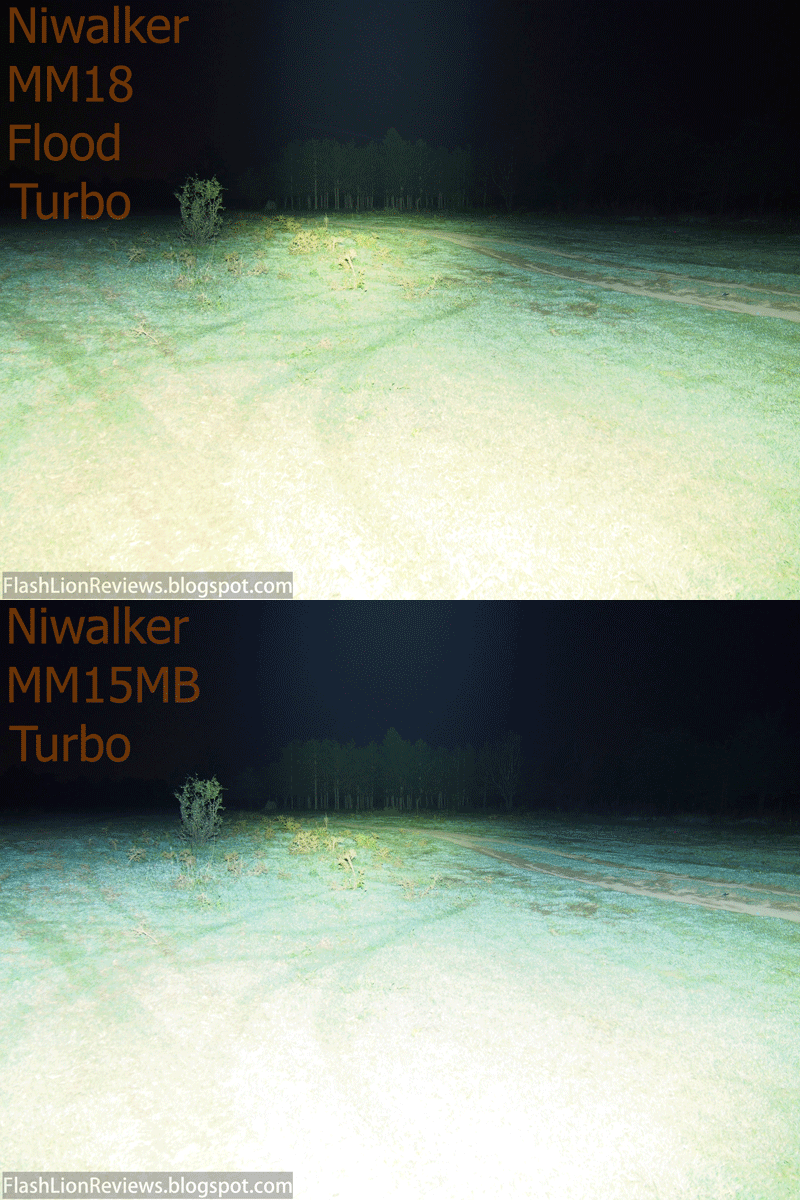


MM18,MM15MB on 5 mode.(pictures below)

Niwalker MM18 and MM15MB on Flood beam,mode 5, Fenix TK51 Flood

Spot+Flood beam
Comparing to the MM15MB,the MM18 has more balanced and easier to use beam.
It is not too wide,which is protecting you from the blinding effect of the reflected 5000+ lumens light from the ground.
You can see it very clearly on the pictures below.


Spot Beam
Closer distance


Flood beam
Closer distance
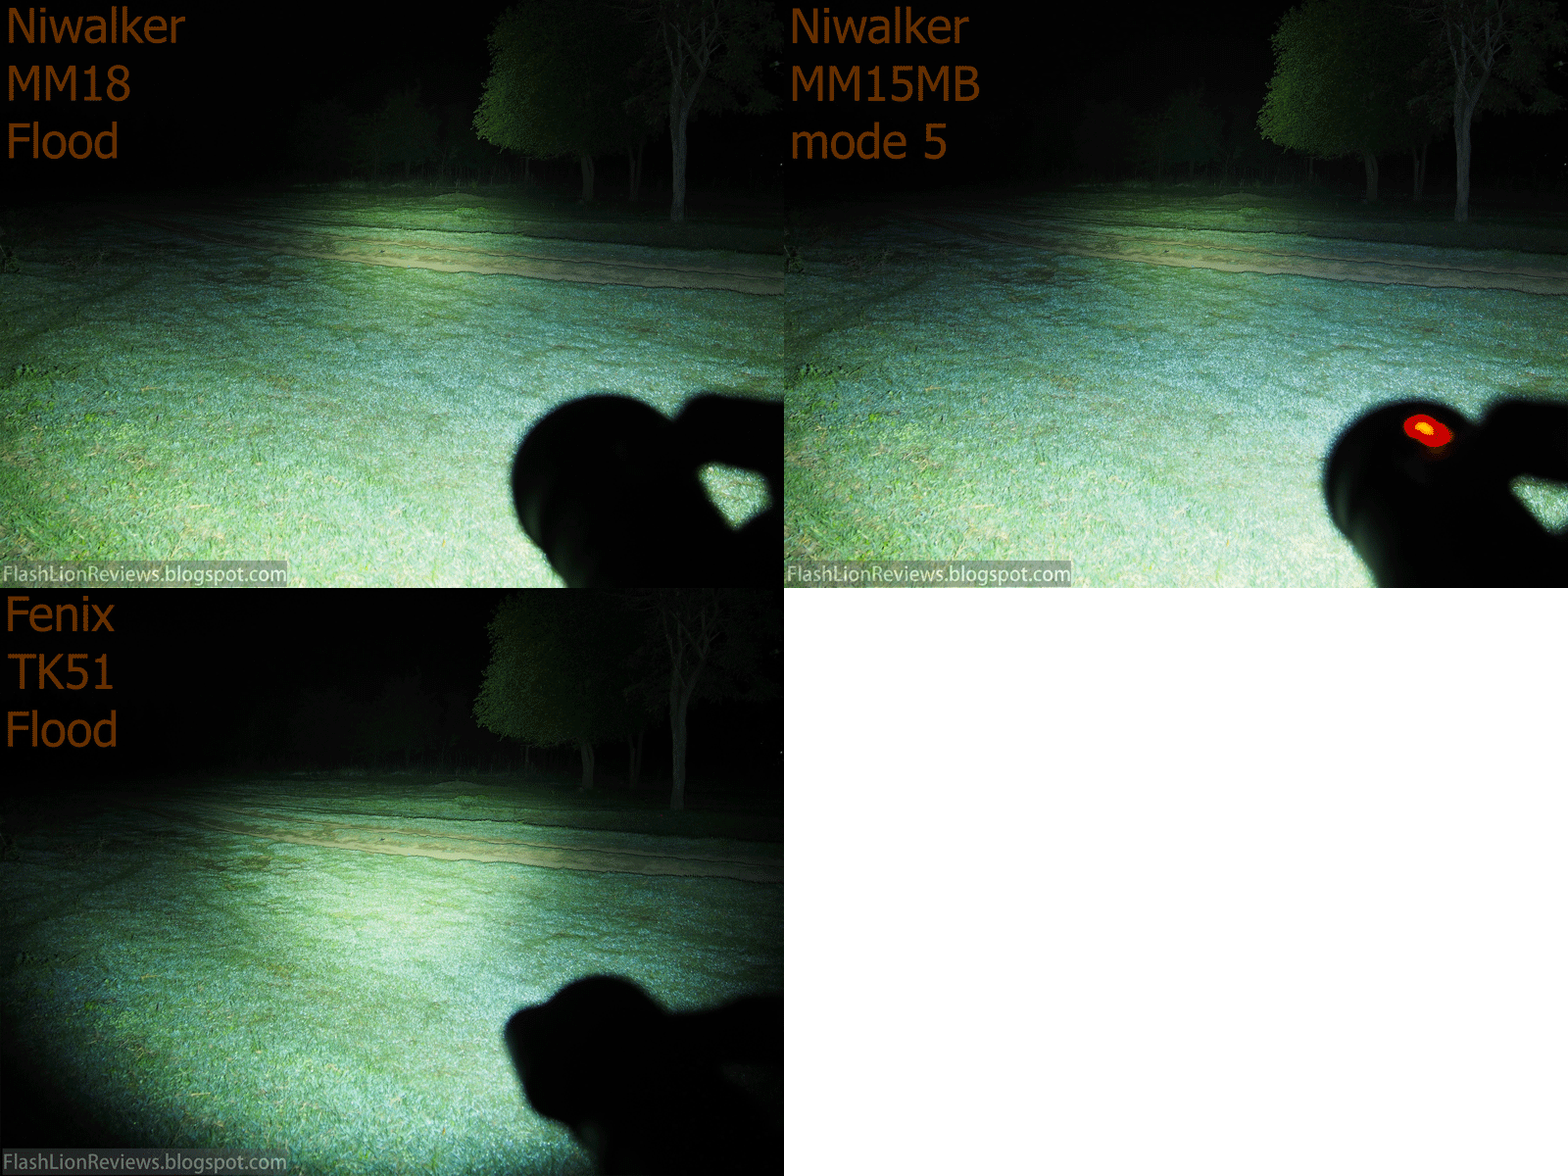


Turbo modes Flood and Spot+Flood beam


Strong points:
Excellent build quality and machining.Excellent heat transfer capability,thanks to the massive aluminum body and copper LED board.
Wide angle flood light and focused spot light in a single flashlight. Very high max output.Relatively compact for what it gives.
Excellent matte anodizing.Conventional user interface-nothing too complicated,or overloaded.
After some usage,my impression of the different beams is only good,as they could be quite useful outdoor or indoor,providing quality illumination.

Weak points:
Here I should add the very high Standby current on first place.It is consuming as high current as the Low mode.
Please read my notice in the beginning of the review!
I found the indicator lights on the switch a little too bright and often distracting.
The switch covers could be thicker and with a larger diameter,people with big hands will benefit from this.
May not be very comfortable in long periods walking and carrying it,due to its weight.
I would prefer to activate the 6th mode with just one press and hold the switch.Activating it takes some time to get used to.

Thanks for reading!

Thanks to NIWALKER for providing the MM18 for test and review!